

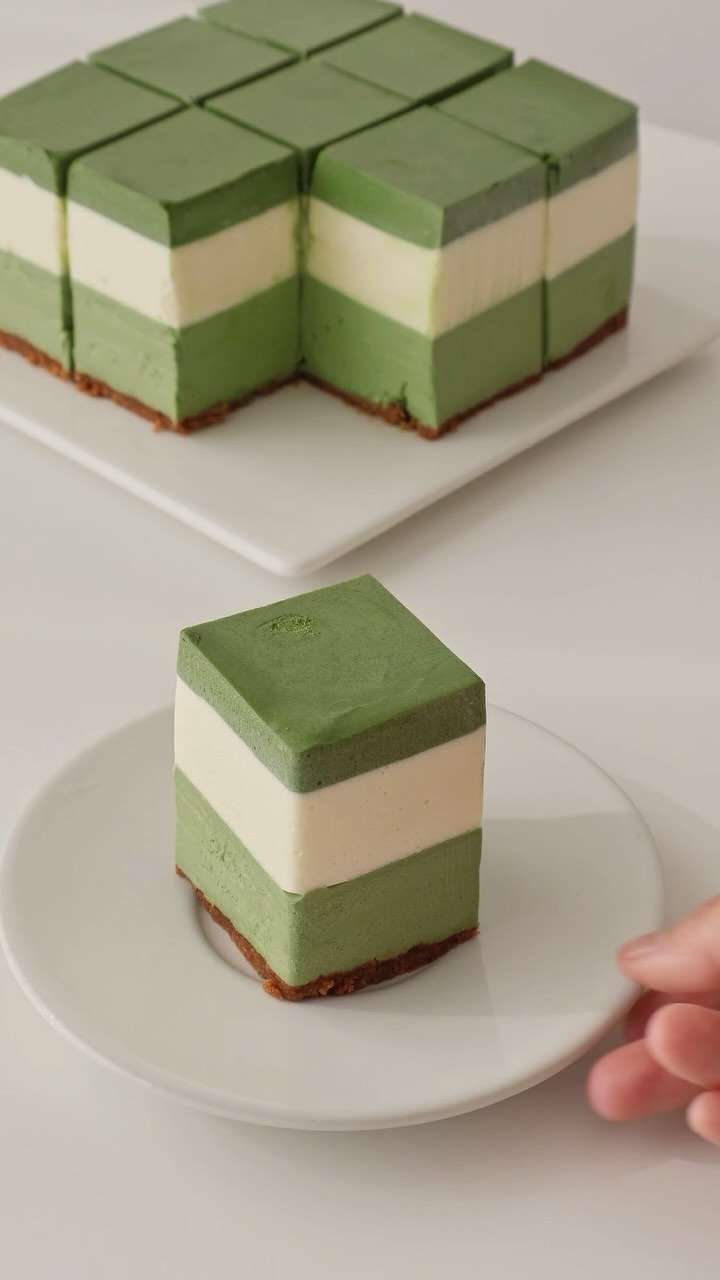
Cheesecake has long been a favorite dessert for many, thanks to its rich, velvety texture and endless flavor variations. However, for those who seek a unique twist on the traditional cheesecake, the Triple Layer Matcha Yogurt Cheesecake offers a delightful fusion of creamy indulgence and the earthy, vibrant flavor of matcha. This dessert not only captivates the taste buds but also provides an aesthetic visual experience with its stunning three layers of different textures and flavors.
In this blog post, we’ll walk through the steps to make this luscious and visually striking Triple-Layer Matcha Yogurt Cheesecake, offering tips and insights along the way. So, roll up your sleeves and get ready to create a masterpiece that will impress your friends and family alike.
What is Matcha?
Before diving into the recipe, let’s talk about matcha for those who might be new to this delightful ingredient. Matcha is a finely ground powder made from specially grown green tea leaves. Unlike traditional green tea, where the leaves are steeped in hot water and discarded, matcha involves consuming the entire leaf in powdered form, which results in a more potent flavor and higher concentration of nutrients. Known for its bright green color and slightly bitter, umami-rich taste, matcha is packed with antioxidants and has been celebrated for its health benefits, including enhancing energy, improving focus, and promoting relaxation. Its unique flavor makes it a perfect complement to creamy desserts like cheesecake, adding a refreshing twist.
Ingredients for the Triple-Layer Matcha Yogurt Cheesecake
To create this decadent dessert, you will need the following ingredients:
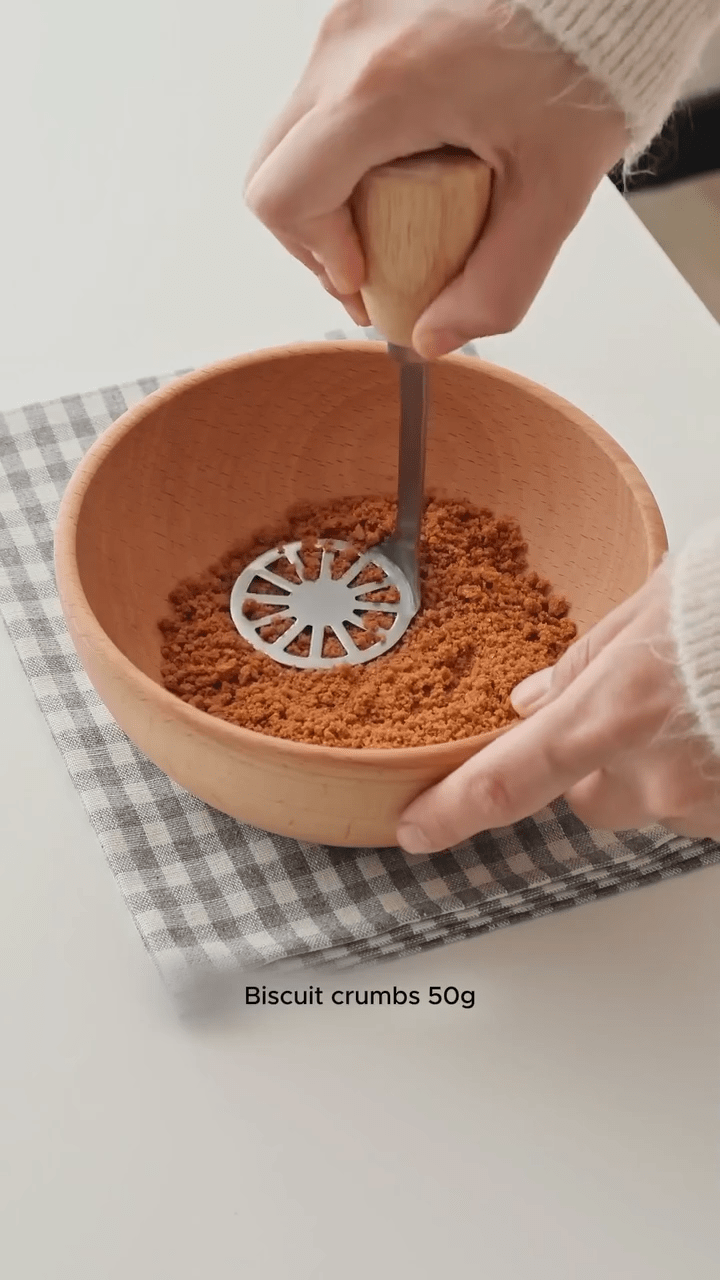
For the Caramel Cookie Crumbs Base:
50g of caramel cookie crumbs
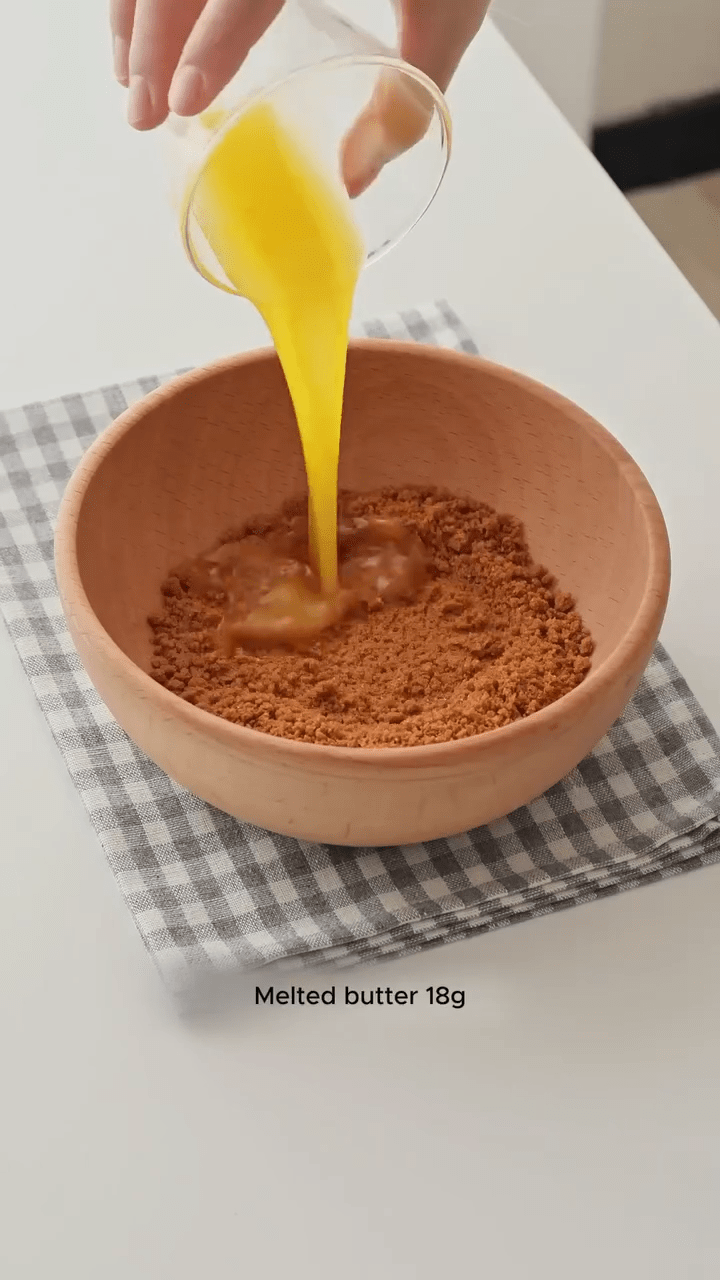
18g of melted butter
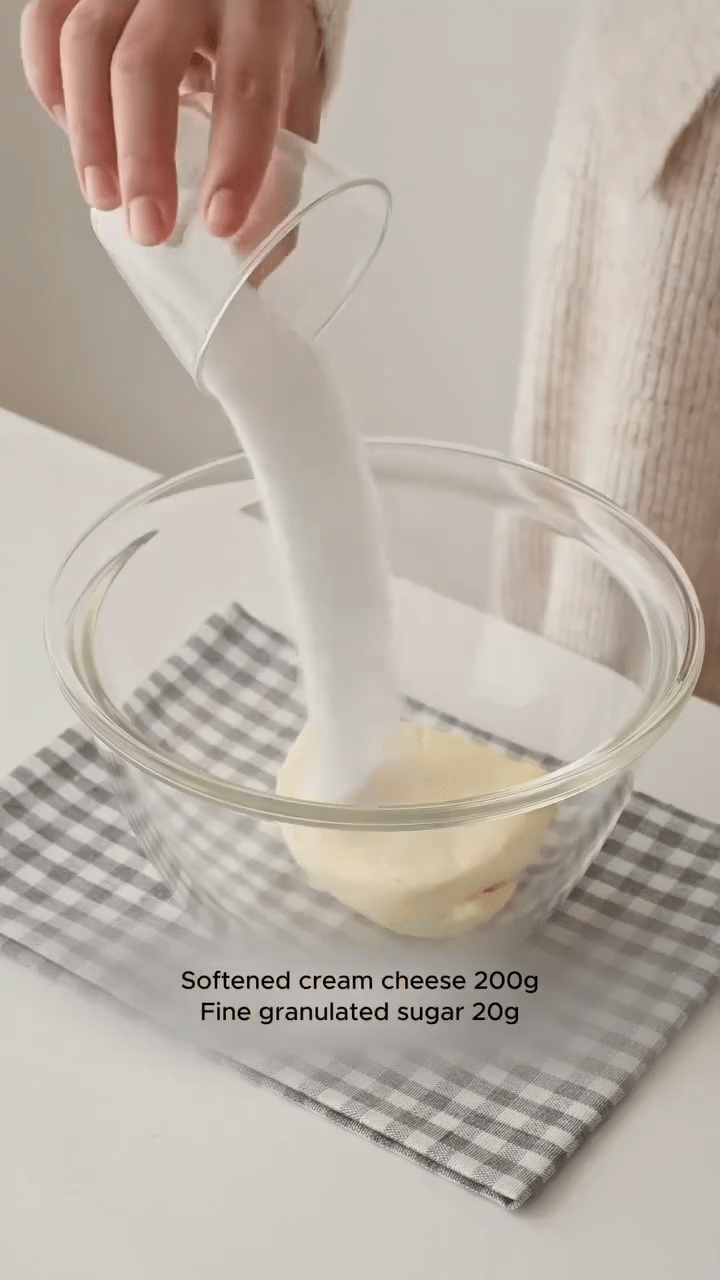
For the Cream Cheese Mixture:
200g of softened cream cheese
20g of fine sugar
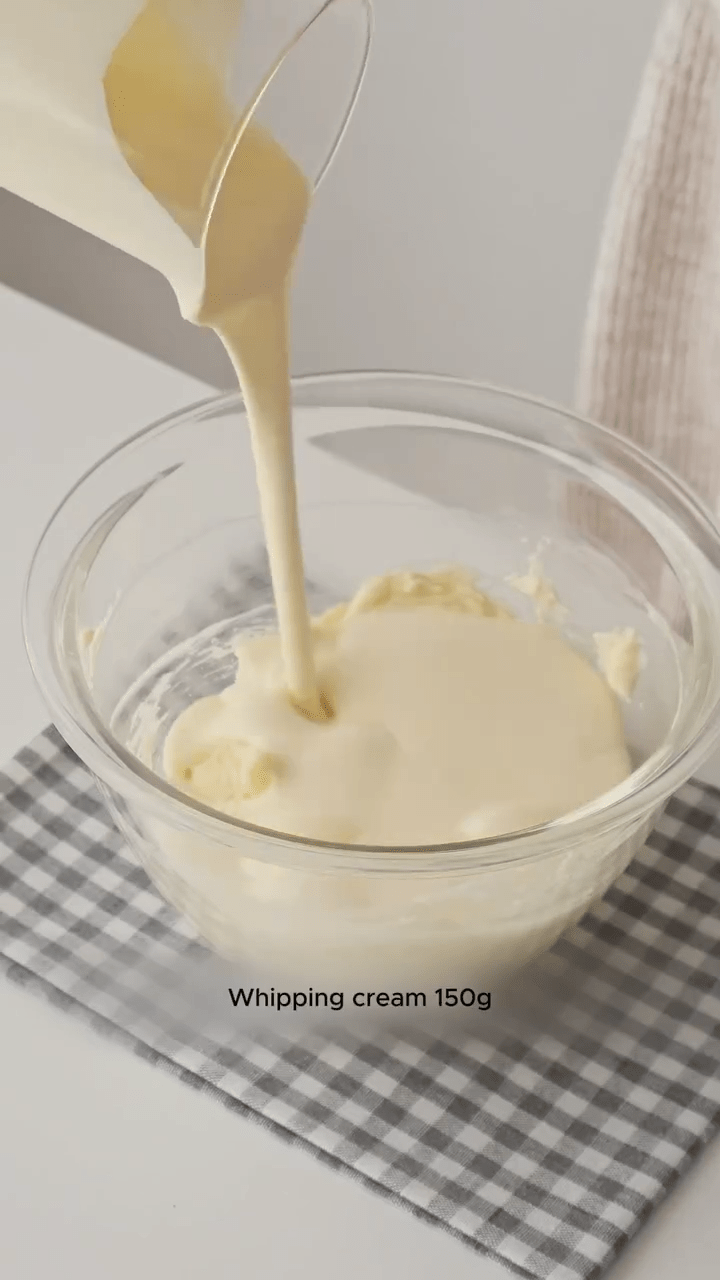
150g of whipping cream
120g of yogurt (preferably Greek yogurt for its thickness)
For the Gelatin Mixture:
10g of soaked gelatin
50g of hot milk
For the Matcha Layer:
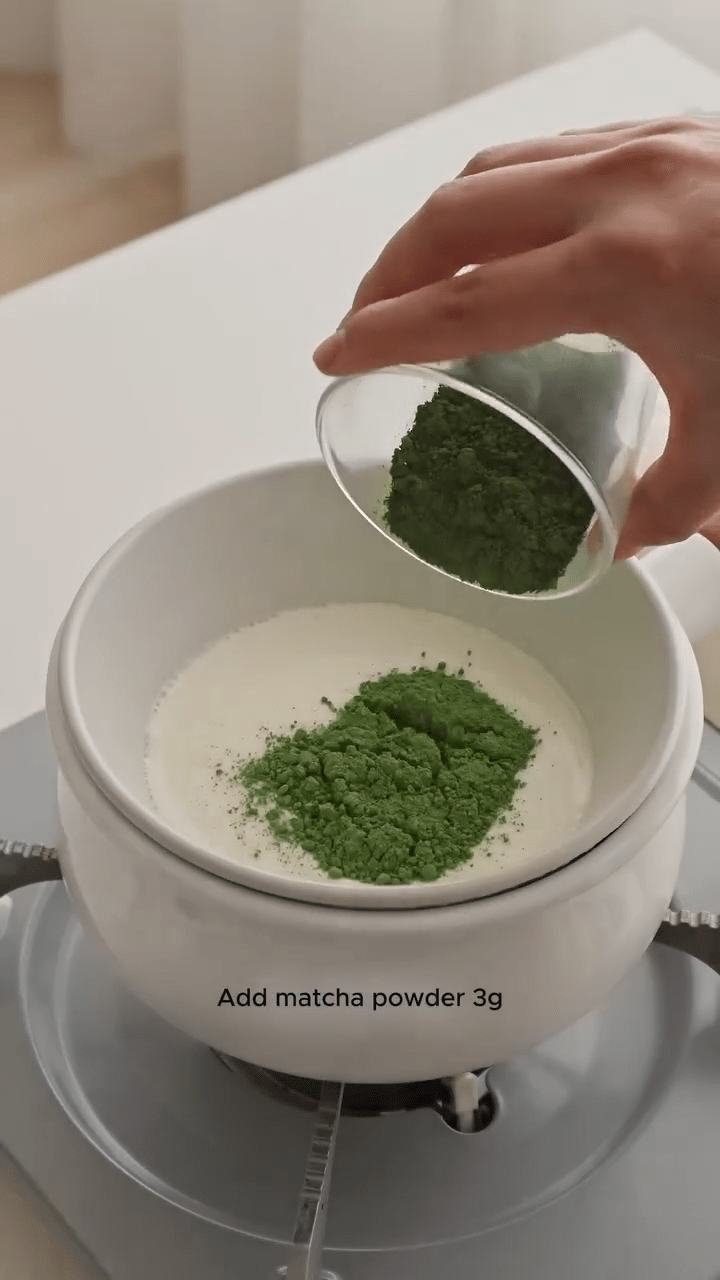
8g of matcha powder
50g of hot milk
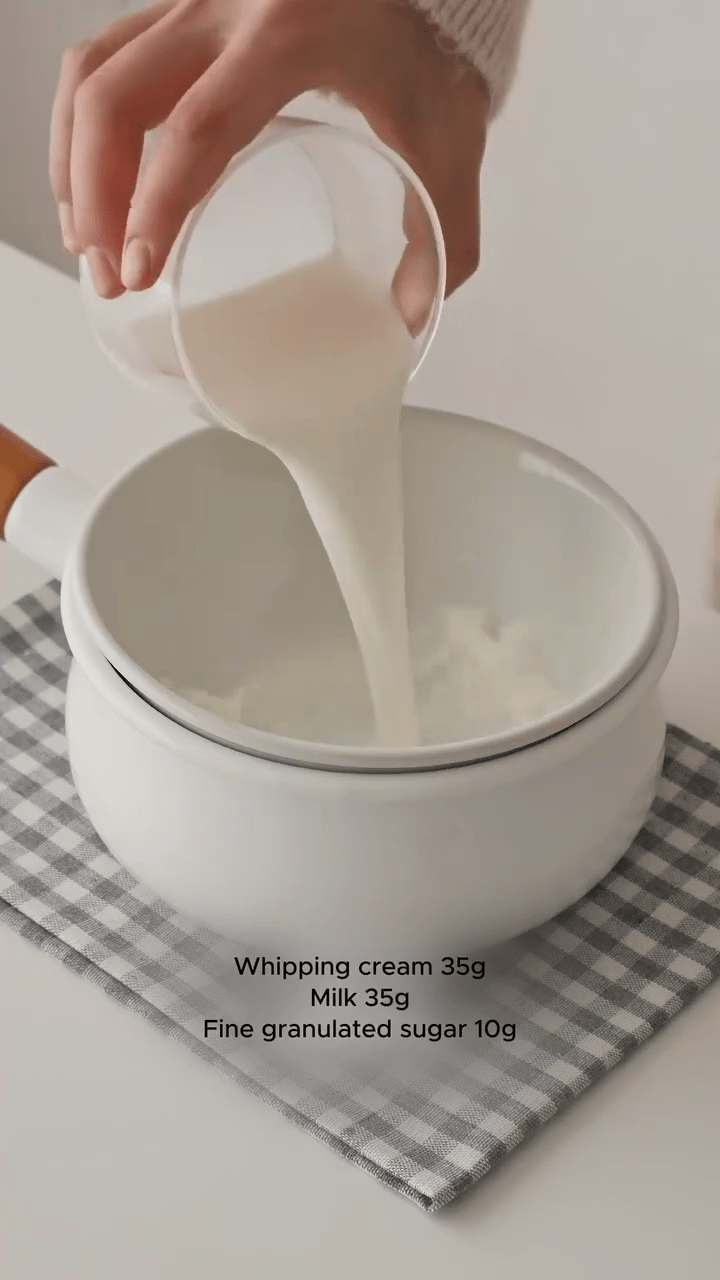
For the Matcha Glaze:
35g of whipping cream
35g of milk
10g of fine sugar
5g of soaked gelatin
With all your ingredients gathered, you are now ready to begin making this stunning dessert. Let’s break down the process step by step.
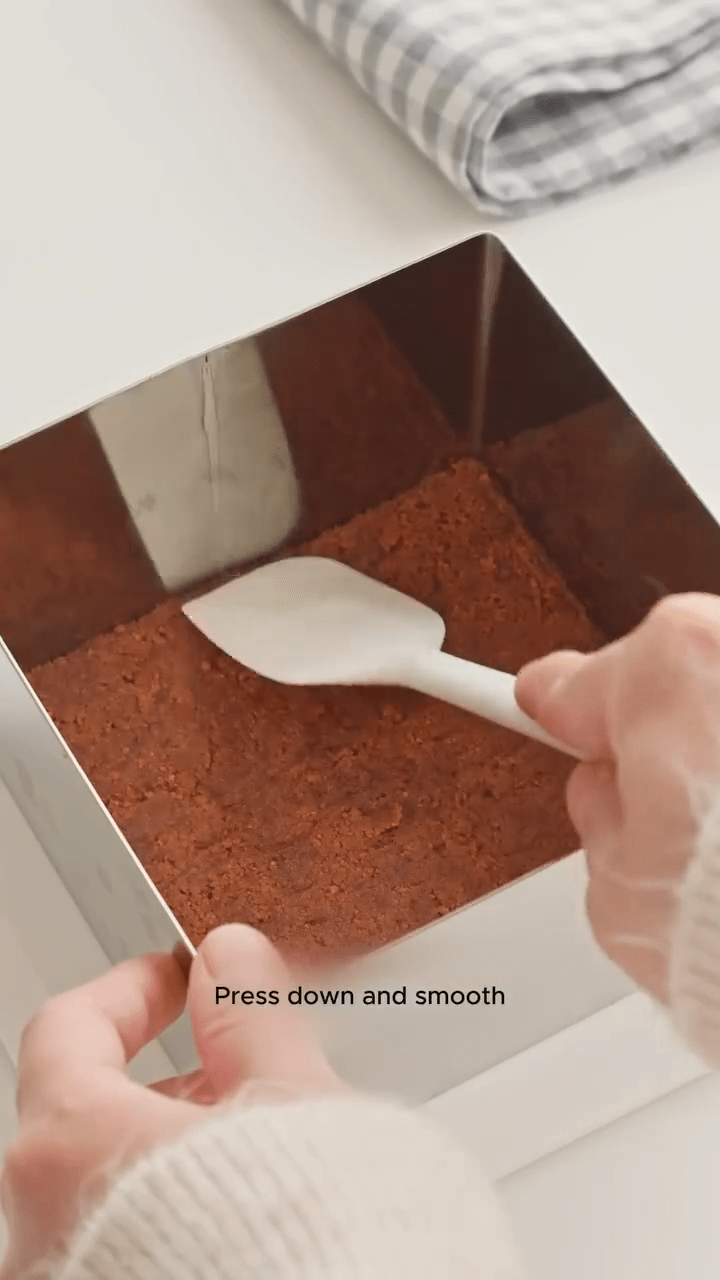
Step 1: Prepare the Biscuit Base
The first step in making this cheesecake is preparing the caramel cookie crumb base. The base adds a crunchy contrast to the creamy layers of the cheesecake, making each bite a balance of textures.
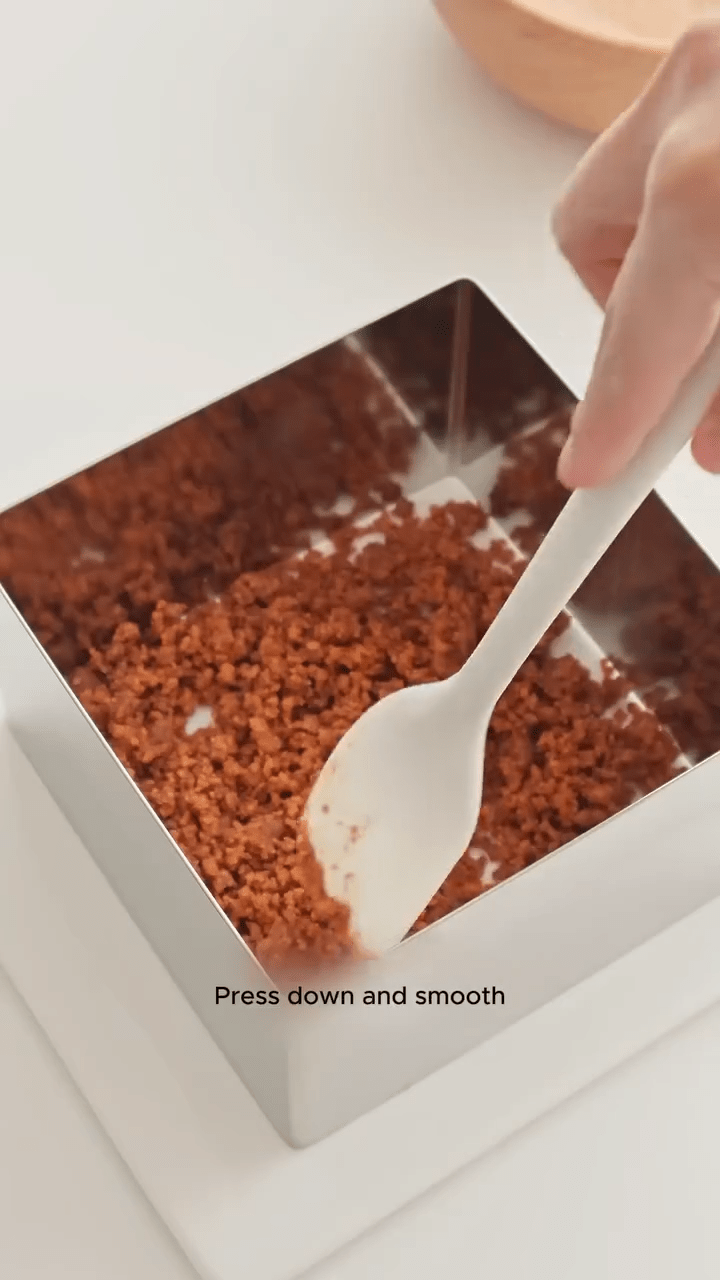
Start by mixing the caramel cookie crumbs with the melted butter until they are evenly combined. Once mixed, pour the crumb mixture into the bottom of a mousse mold or a similar dessert mold of your choice. Press the mixture down firmly to create an even and compact layer. This is essential for a sturdy base that will hold the cheesecake layers above. After pressing the crumbs down, place the mold in the freezer and allow the base to set for about 30 minutes. This step ensures the crust remains firm as you add the layers of cream cheese mixture on top.
 |  |  |  |
Step 2: Prepare the Cream Cheese Mixture
While the crust sets, you can prepare the main creamy filling for the cheesecake. In a mixing bowl, beat the softened cream cheese and fine sugar together until smooth and creamy. This is an important step, as a smooth mixture ensures a silky texture for the final cheesecake.
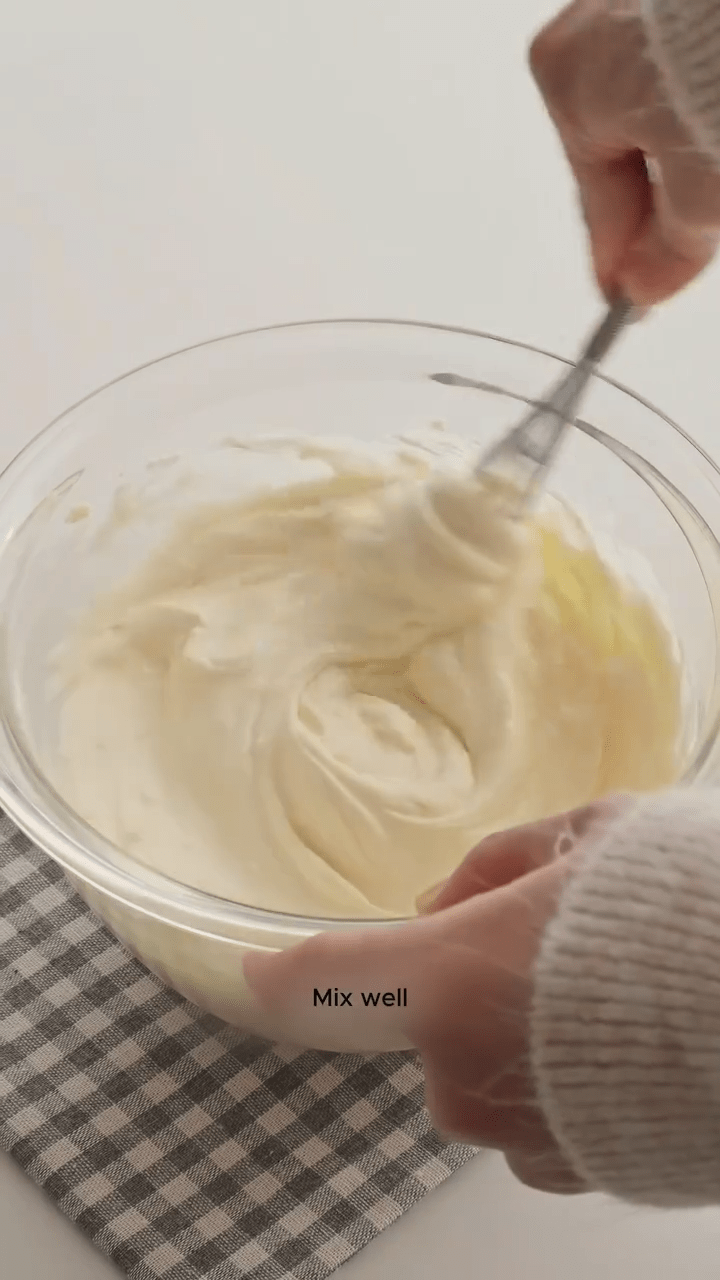
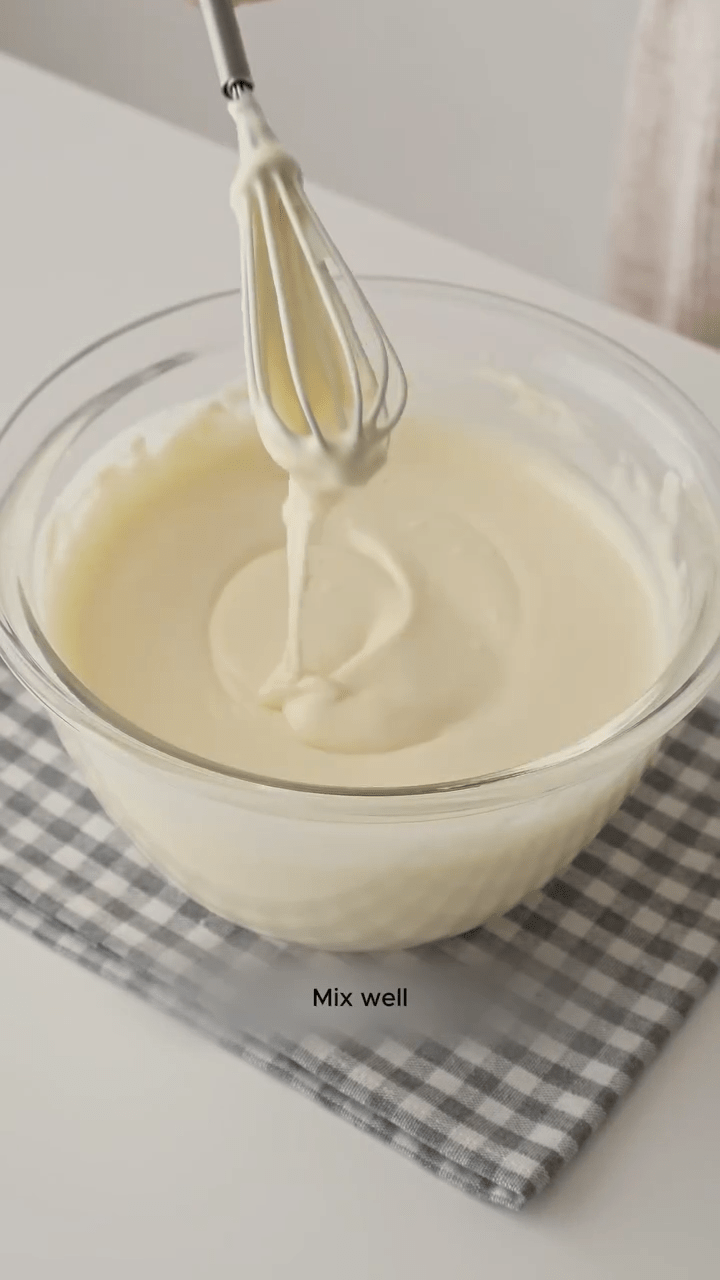
Once the cream cheese is smooth, add the whipping cream and continue to whip the mixture until it thickens. The whipping cream helps to achieve the rich, fluffy consistency typical of cheesecakes. After the cream cheese mixture thickens, add the yogurt and mix thoroughly to combine. The yogurt not only adds a pleasant tang to the cheesecake but also contributes to the creaminess of the dessert.
 |  |  |  |
Step 3: Dissolve the Gelatin
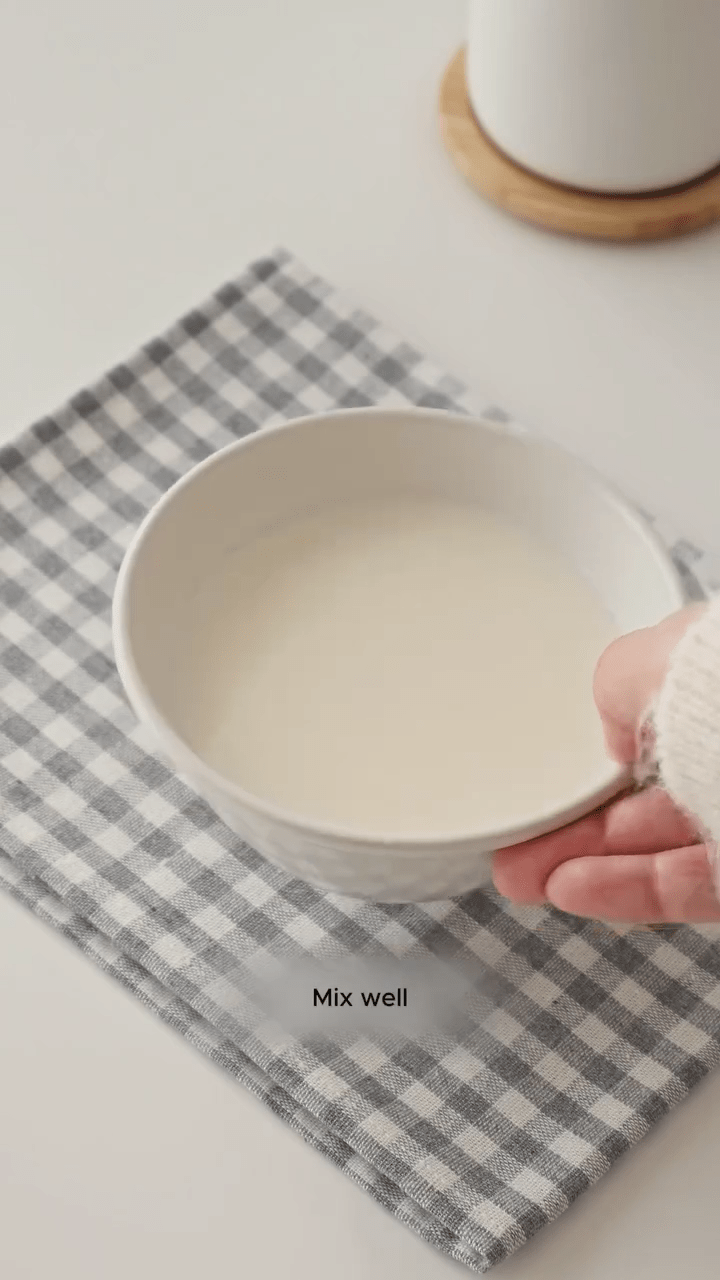
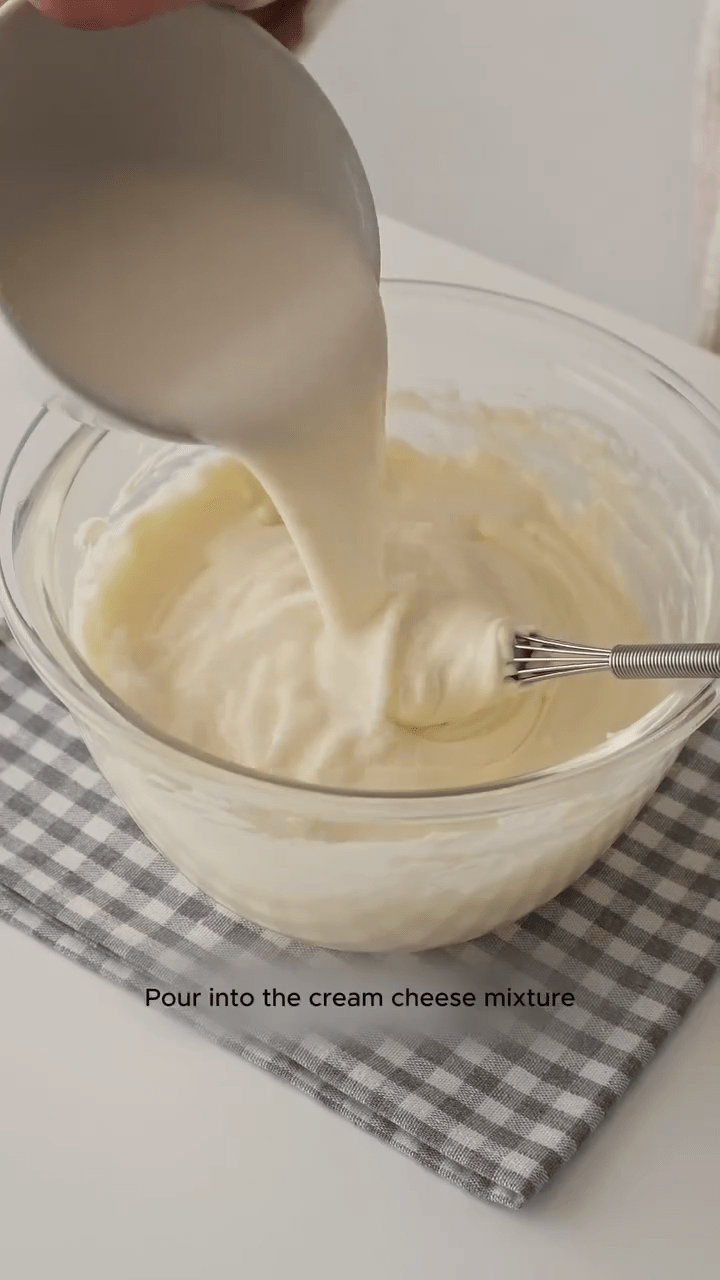
Gelatin plays a critical role in this recipe by helping the cheesecake hold its shape and maintain its layers. To prepare the gelatin, soak 10g of gelatin sheets in cold water for a few minutes. After soaking, dissolve the gelatin in 50g of hot milk. Stir the mixture well until the gelatin completely dissolves and blends into the milk. Once dissolved, pour the gelatin mixture into the cream cheese mixture and stir to combine. This ensures that the gelatin is evenly distributed, which is key to achieving the desired texture in the cheesecake.
 |  |  |  |
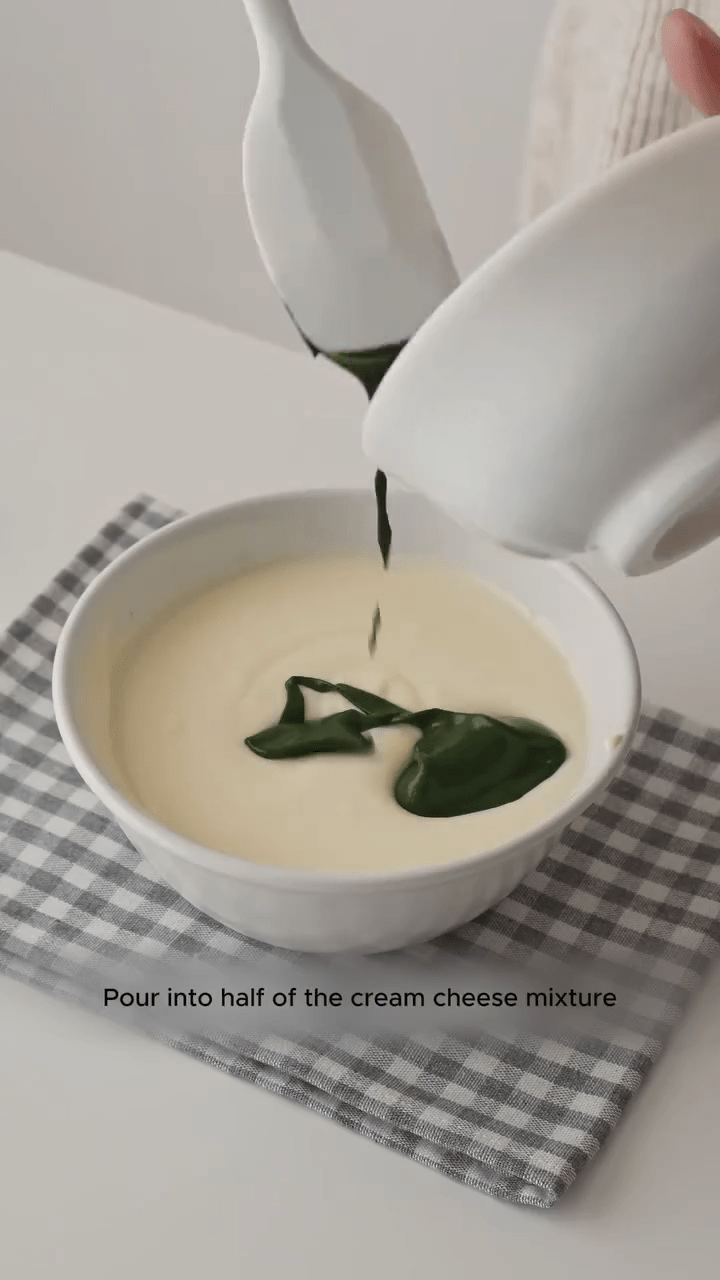
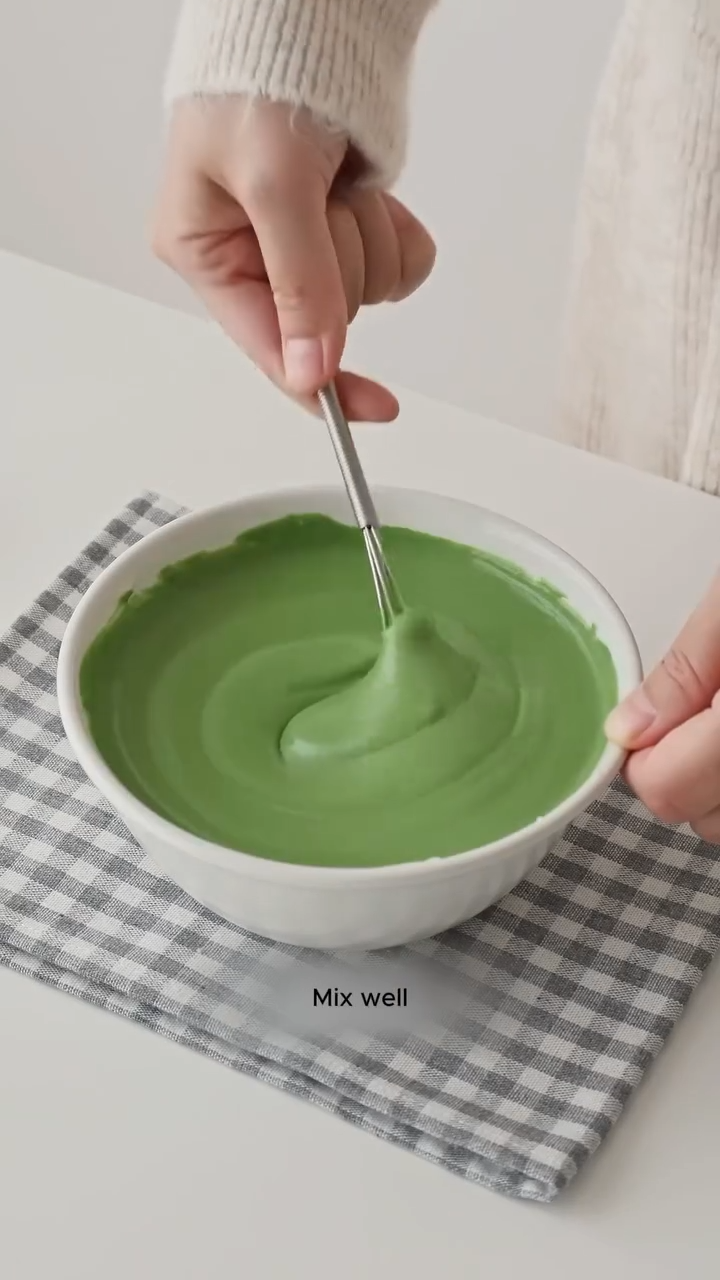
Step 4: Add Matcha to Half the Cream Cheese Mixture
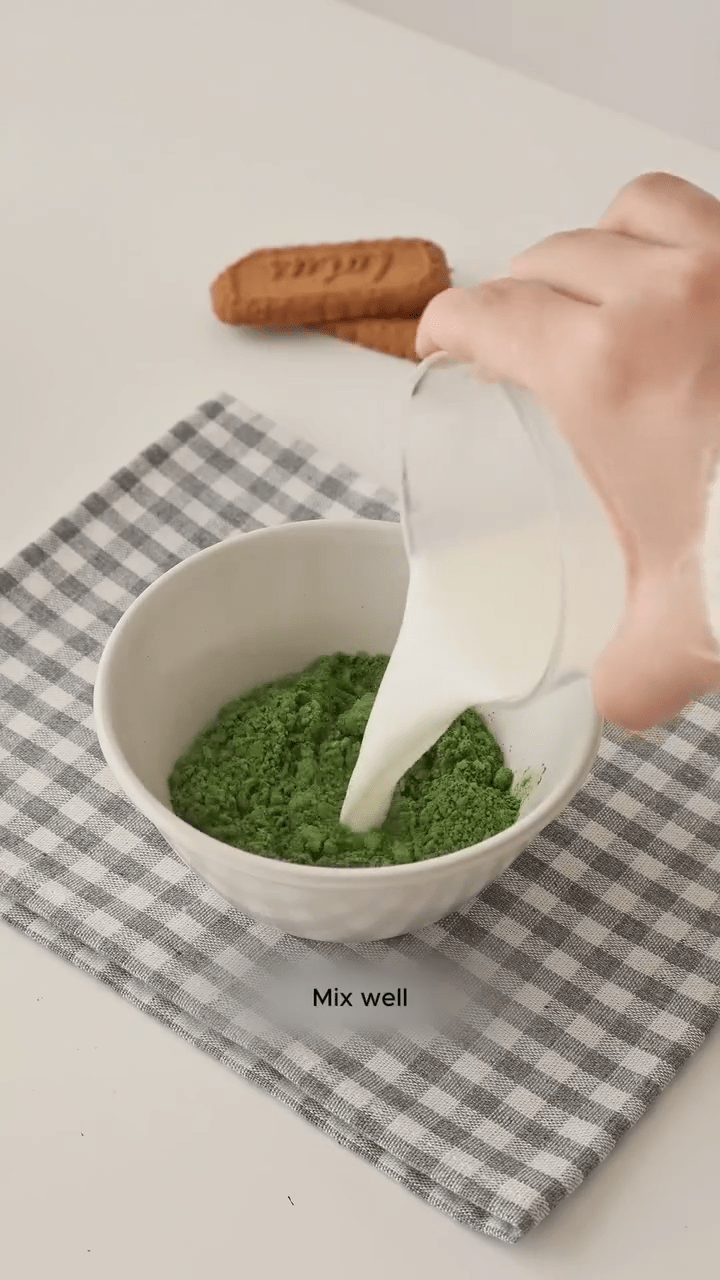
Now, divide the cream cheese mixture in half. To one half, add the matcha powder dissolved in 50g of hot milk. Stir the mixture well to ensure that the matcha is evenly incorporated. This will create a vibrant green layer of matcha-flavored cream cheese. The other half of the mixture remains plain, which will form the white layer of the cheesecake.
 |  |  |  |
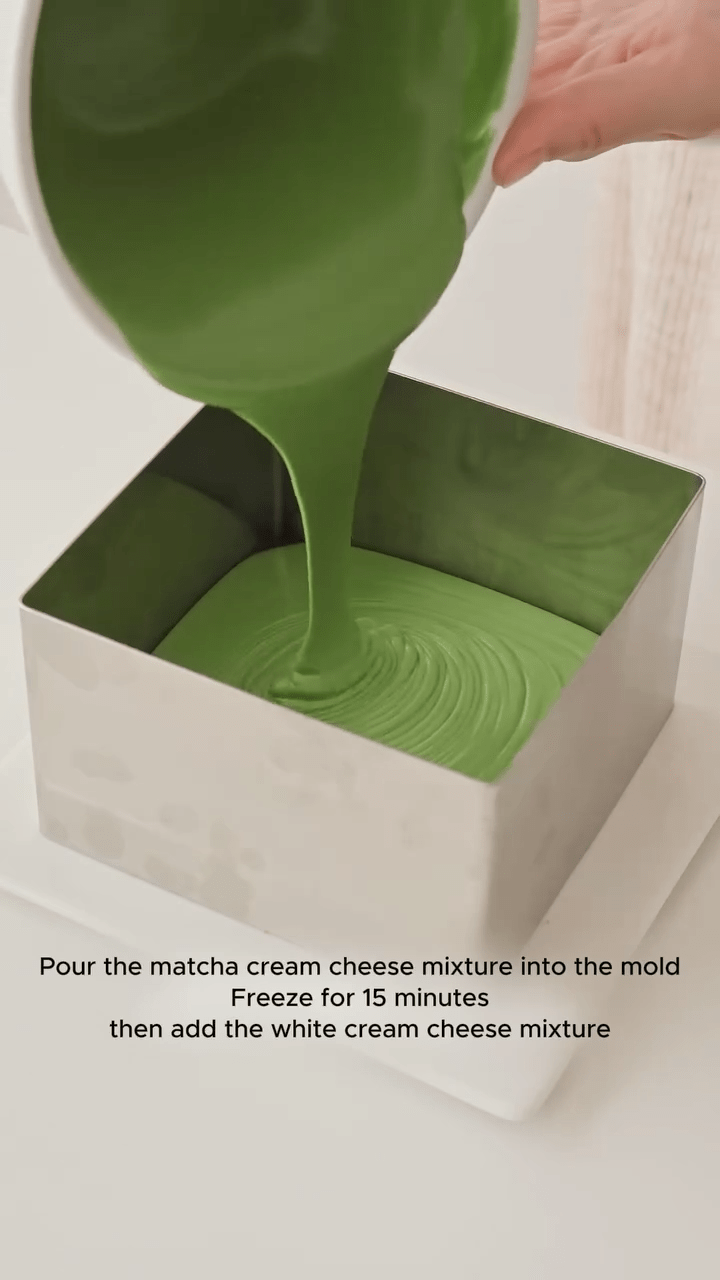
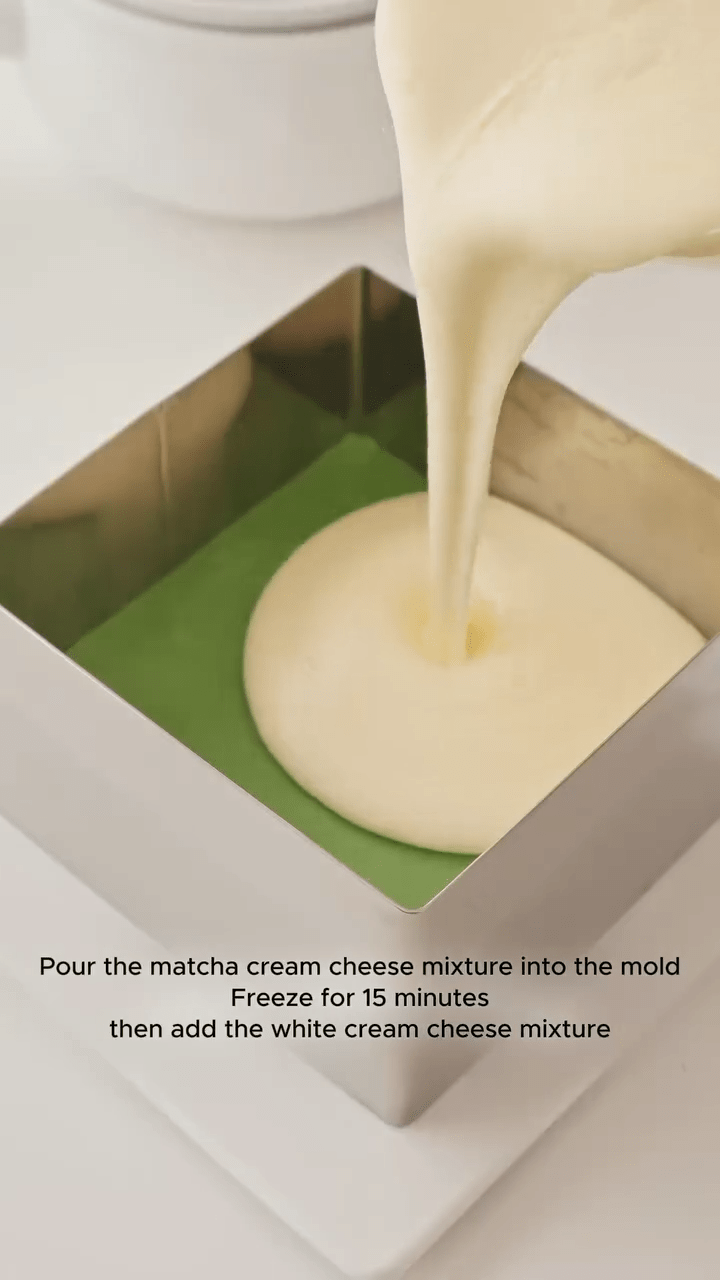
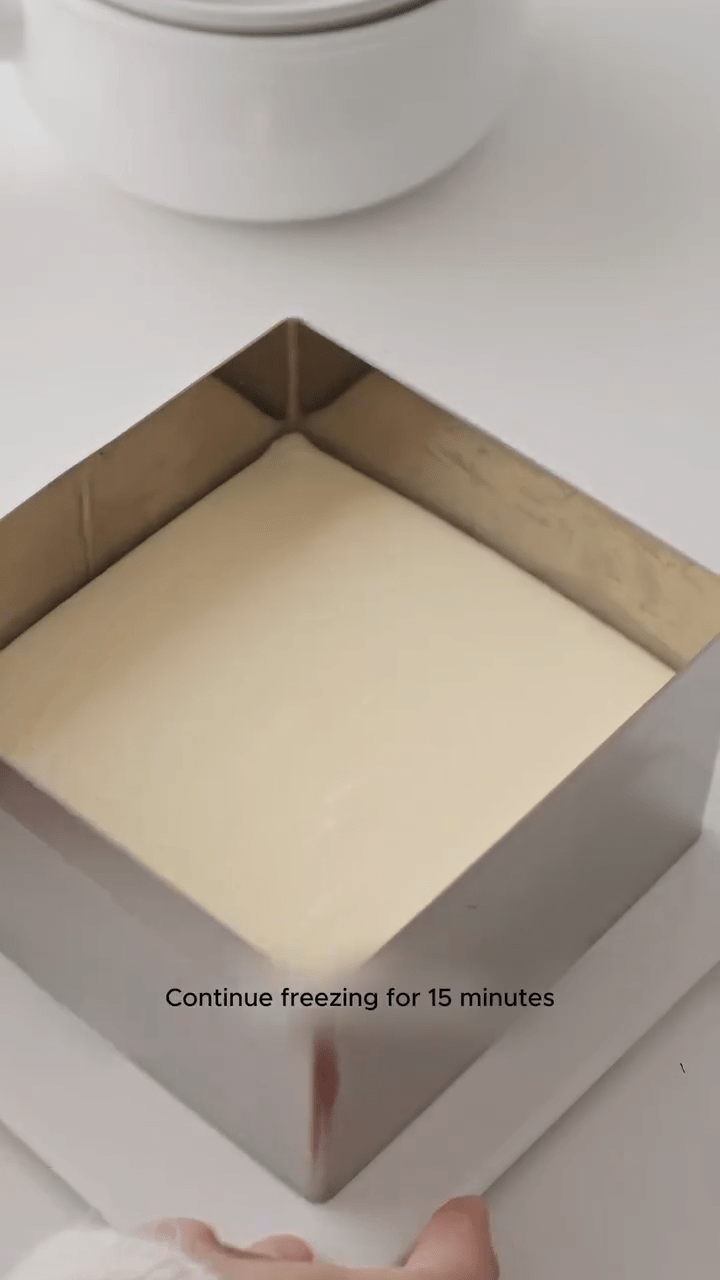
Step 5: Layering the Cheesecake
With the cream cheese mixtures prepared, it’s time to start assembling the layers. Begin by pouring the green matcha cream cheese mixture into the mold, spreading it evenly across the crust. Once the green layer is in place, freeze the mold for about 15 minutes to allow this layer to set.
After the green layer has set, pour the remaining white cream cheese mixture over the top of the green layer. Again, spread it evenly. Freeze the cheesecake for another 15 minutes to ensure that both layers are firm and stable.
 |  |  |
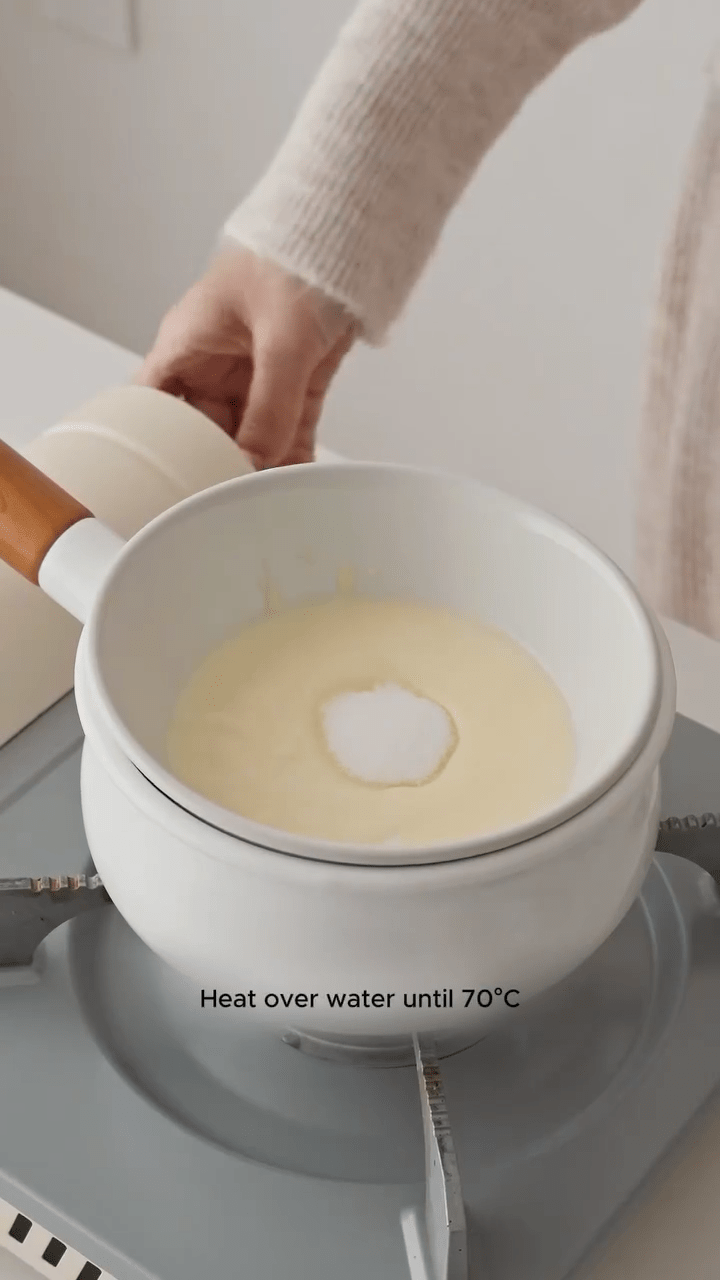
Step 6: Prepare the Matcha Glaze
While the cheesecake layers set in the freezer, it’s time to make the matcha glaze that will finish the dessert. In a small saucepan, heat the whipping cream, milk, and fine sugar over a double boiler or in a water bath, until it reaches about 70°C (158°F). Once the mixture is heated, add the matcha powder and stir until smooth and fully dissolved.
Next, add the soaked gelatin sheets to the mixture and stir until they are completely dissolved. This glaze will provide a glossy, vibrant green topping that enhances the visual appeal of the cheesecake.
 |  |  | 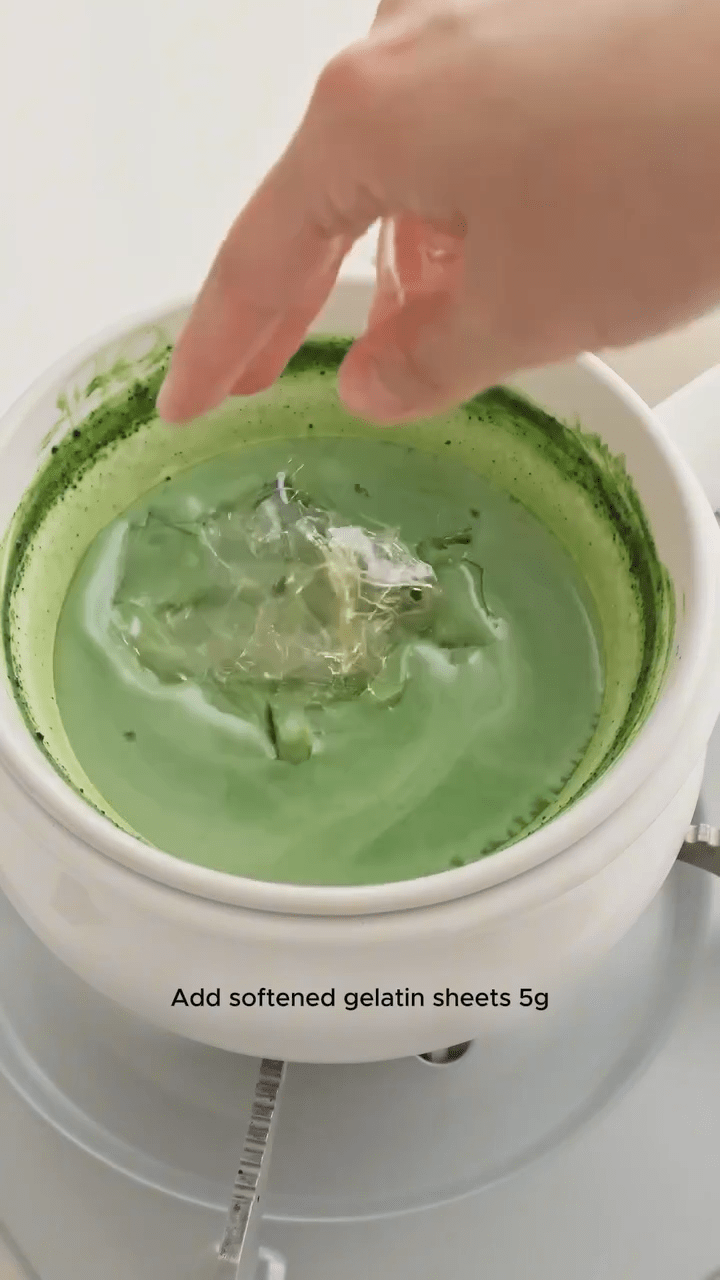 |
Step 7: Final Layer and Refrigeration
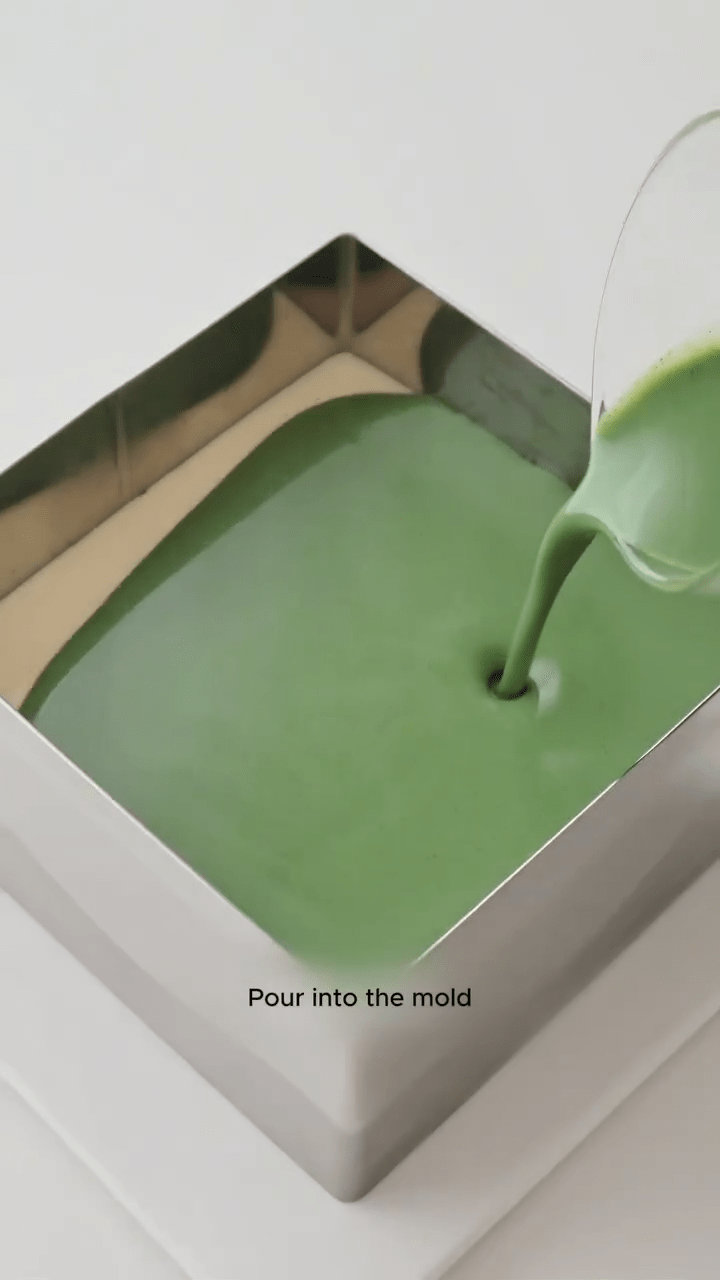
Pour the matcha glaze over the chilled cheesecake and spread it evenly across the top. The glaze will set into a beautiful, smooth layer once chilled. Place the cheesecake in the refrigerator for at least 4 hours to allow it to fully set and firm up. This step is crucial for achieving the perfect texture and ensuring that the layers hold together when unmolded.
Step 8: Unmold and Serve
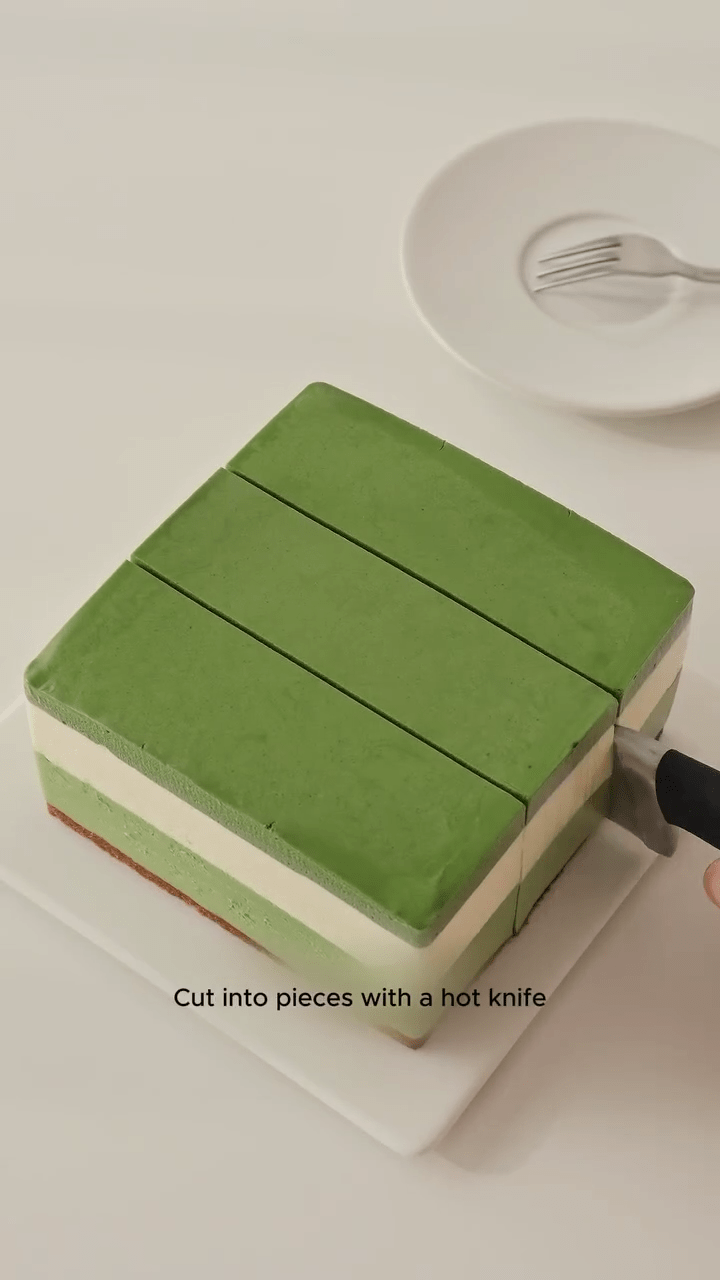
After the cheesecake has chilled and set, carefully remove it from the mold. You’ll be left with a beautiful, three-layered cheesecake, with the matcha glaze forming a glossy green top. Slice the cheesecake into individual portions and serve. You’ll be amazed by the balance of flavors: the creamy, tangy base with the earthy matcha layers that add depth and character to each bite.
 |  |
Conclusion
The Triple-Layer Matcha Yogurt Cheesecake is a perfect dessert for those who love the combination of creamy indulgence and the distinct flavor of matcha. Its delicate layers, smooth texture, and eye-catching appearance make it an ideal choice for special occasions or as a show-stopping treat for any dessert lover. With a bit of patience and attention to detail, you’ll create a dessert that not only tastes incredible but also looks like a work of art.
Whether you’re a seasoned baker or a beginner in the kitchen, this recipe is a fantastic way to elevate your dessert-making skills and bring a touch of Japanese-inspired elegance to your table. Enjoy the process and, of course, the delicious results!
Must try Chocolate Cream Cheese Filled Buns Recipe
Triple Layer Matcha Yogurt Cheesecake Recipe

Learn how to make a delicious Triple Layer Matcha Yogurt Cheesecake with creamy layers, a crunchy base, and a glossy matcha glaze.
Type: Dessert
Cuisine: Japanese-Inspired, Fusion
Keywords: matcha cheesecake, yogurt cheesecake, creamy dessert, three-layer cheesecake, matcha glaze, no-bake cheesecake
Recipe Yield: 8-10 servings
Calories: Approx. 300-350 calories per serving (depending on portion size)
Preparation Time: 30 minutes
Cooking Time: 15 minutes
Total Time: 4 hours 45 minutes (including chilling time)
Recipe Ingredients:
- 50g caramel cookie crumbs
- 18g melted butter
- 200g softened cream cheese
- 20g fine sugar
- 150g whipping cream
- 120g yogurt
- 10g soaked gelatin
- 50g hot milk
- 8g matcha powder
- 50g hot milk
- 35g whipping cream
- 35g milk
- 10g fine sugar
- 5g soaked gelatin
Recipe Instructions:
Step 1: Prepare the Biscuit Base:
- The first step in making this cheesecake is preparing the caramel cookie crumb base. The base adds a crunchy contrast to the creamy layers of the cheesecake, making each bite a balance of textures. Start by mixing the caramel cookie crumbs with the melted butter until they are evenly combined. Once mixed, pour the crumb mixture into the bottom of a mousse mold or a similar dessert mold of your choice. Press the mixture down firmly to create an even and compact layer. This is essential for a sturdy base that will hold the cheesecake layers above. After pressing the crumbs down, place the mold in the freezer and allow the base to set for about 30 minutes. This step ensures the crust remains firm as you add the layers of cream cheese mixture on top.
Step 2: Prepare the Cream Cheese Mixture:
- While the crust sets, you can prepare the main creamy filling for the cheesecake. In a mixing bowl, beat the softened cream cheese and fine sugar together until smooth and creamy. This is an important step, as a smooth mixture ensures a silky texture for the final cheesecake. Once the cream cheese is smooth, add the whipping cream and continue to whip the mixture until it thickens. The whipping cream helps to achieve the rich, fluffy consistency typical of cheesecakes. After the cream cheese mixture thickens, add the yogurt and mix thoroughly to combine. The yogurt not only adds a pleasant tang to the cheesecake but also contributes to the creaminess of the dessert.
Step 3: Dissolve the Gelatin:
- Gelatin plays a critical role in this recipe by helping the cheesecake hold its shape and maintain its layers. To prepare the gelatin, soak 10g of gelatin sheets in cold water for a few minutes. After soaking, dissolve the gelatin in 50g of hot milk. Stir the mixture well until the gelatin completely dissolves and blends into the milk. Once dissolved, pour the gelatin mixture into the cream cheese mixture and stir to combine. This ensures that the gelatin is evenly distributed, which is key to achieving the desired texture in the cheesecake.
Step 4: Add Matcha to Half the Cream Cheese Mixture:
- Now, divide the cream cheese mixture in half. To one half, add the matcha powder dissolved in 50g of hot milk. Stir the mixture well to ensure that the matcha is evenly incorporated. This will create a vibrant green layer of matcha-flavored cream cheese. The other half of the mixture remains plain, which will form the white layer of the cheesecake.
Step 5: Layering the Cheesecake:
- With the cream cheese mixtures prepared, it’s time to start assembling the layers. Begin by pouring the green matcha cream cheese mixture into the mold, spreading it evenly across the crust. Once the green layer is in place, freeze the mold for about 15 minutes to allow this layer to set. After the green layer has set, pour the remaining white cream cheese mixture over the top of the green layer. Again, spread it evenly. Freeze the cheesecake for another 15 minutes to ensure that both layers are firm and stable.
Step 6: Prepare the Matcha Glaze:
- While the cheesecake layers set in the freezer, it’s time to make the matcha glaze that will finish the dessert. In a small saucepan, heat the whipping cream, milk, and fine sugar over a double boiler or in a water bath, until it reaches about 70°C (158°F). Once the mixture is heated, add the matcha powder and stir until smooth and fully dissolved. Next, add the soaked gelatin sheets to the mixture and stir until they are completely dissolved. This glaze will provide a glossy, vibrant green topping that enhances the visual appeal of the cheesecake.
Step 7: Final Layer and Refrigeration:
- Pour the matcha glaze over the chilled cheesecake and spread it evenly across the top. The glaze will set into a beautiful, smooth layer once chilled. Place the cheesecake in the refrigerator for at least 4 hours to allow it to fully set and firm up. This step is crucial for achieving the perfect texture and ensuring that the layers hold together when unmolded.
Step 8: Unmold and Serve:
- After the cheesecake has chilled and set, carefully remove it from the mold. You’ll be left with a beautiful, three-layered cheesecake, with the matcha glaze forming a glossy green top. Slice the cheesecake into individual portions and serve. You’ll be amazed by the balance of flavors: the creamy, tangy base with the earthy matcha layers that add depth and character to each bite.