

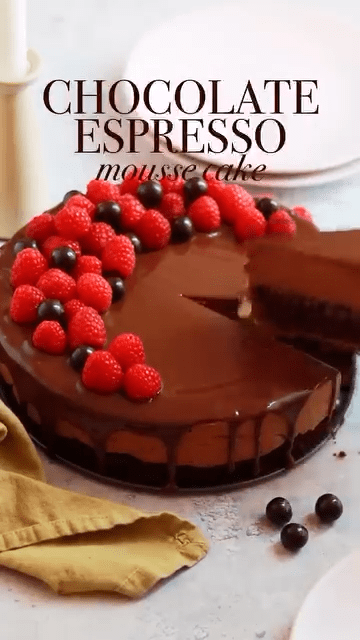
If you love rich chocolate desserts with a hint of bold coffee flavor, you are in for a real treat. Today, I’m sharing the ultimate Chocolate Espresso Mousse Cake recipe — a luscious combination of moist chocolate cake and airy espresso mousse that will absolutely melt in your mouth. Whether you’re making it for a special occasion, a birthday, or just because you deserve something decadent, this cake will win everyone’s heart with the very first bite.
This recipe yields 12 perfect slices, but trust me, you might be tempted to grab more than one. Let’s dive right into this irresistible creation!
The Layers of Perfection
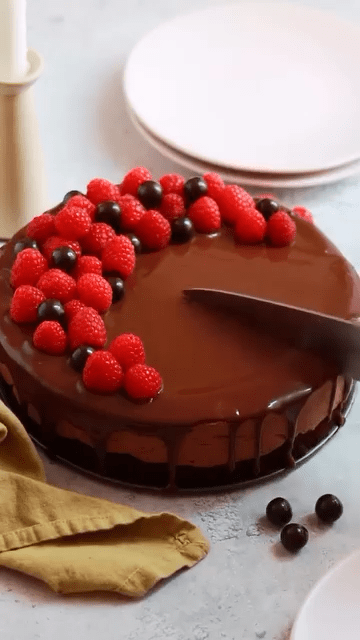
What makes this Chocolate Espresso Mousse Cake truly special is its layered structure. You have a rich, moist chocolate cake as the base, topped with a dreamy chocolate espresso mousse. Every forkful is light, creamy, and packed with flavor, thanks to the perfect balance of chocolate and espresso. And to make it even more heavenly, we finish it off with a silky ganache, fresh raspberries, and crunchy chocolate-covered espresso beans. Pure magic.
Ingredients You’ll Need
Before we jump into the step-by-step guide, here’s what you’ll need for each part of the cake.
Chocolate Cake Layer
For the base, we use a halved chocolate cake baked in a well-lined 9-inch springform pan. You can use your favorite chocolate cake recipe or even a boxed mix if you’re short on time. The key is to have a moist, tender cake that can hold the mousse layer beautifully.
Chocolate Espresso Mousse Layer
2 Cups (370g) semi-sweet chocolate chips
2 ⅓ Cups (560ml) heavy whipping cream, divided
2 Tablespoons Amoretti Natural Espresso Coffee Artisan Flavor
2 Tablespoons powdered sugar
1/2 teaspoon pure vanilla extract
These ingredients will transform into a smooth, fluffy mousse that adds a luxurious texture and flavor to your cake.
Step-by-Step Instructions
Ready to get started? Let’s break it down.
Step 1: Prepare the Chocolate Cake
First, bake your favorite chocolate cake in a 9-inch springform pan. Once baked, allow it to cool completely. Then carefully slice the cake in half horizontally to create two thinner layers. For this recipe, we’re using just one half as the base, so you can save the other half for another dessert or enjoy it with a cup of coffee later!
Line the springform pan again with parchment paper or plastic wrap, place one cake layer back into the bottom, and set aside.
Step 2: Make the Chocolate Ganache
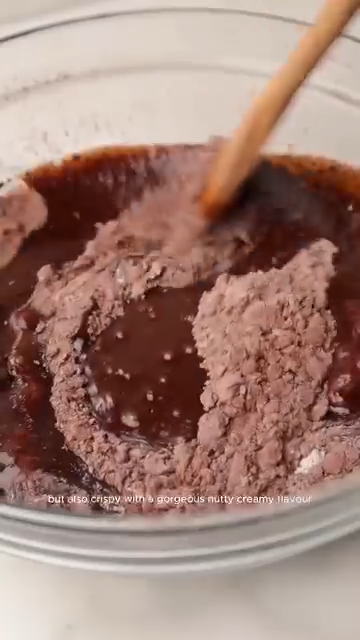
Place the semi-sweet chocolate chips in a glass or metal bowl. In a small saucepan, heat 1 cup of heavy whipping cream over medium-low heat. Watch carefully and remove from heat once it begins to simmer gently around the edges. Pour the hot cream over the chocolate chips and let it sit for a minute. Then whisk it into a smooth, glossy ganache. Set aside and allow it to cool to room temperature, which should take about 25 minutes.
Tip: Cooling the ganache is important! If it’s too warm, it will deflate your whipped cream and make the mousse runny.
 |  |
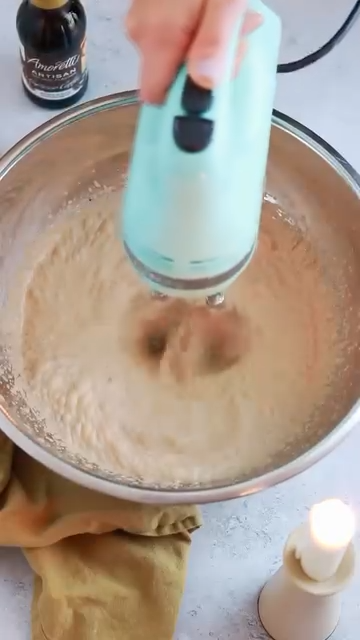
Step 3: Whip the Cream
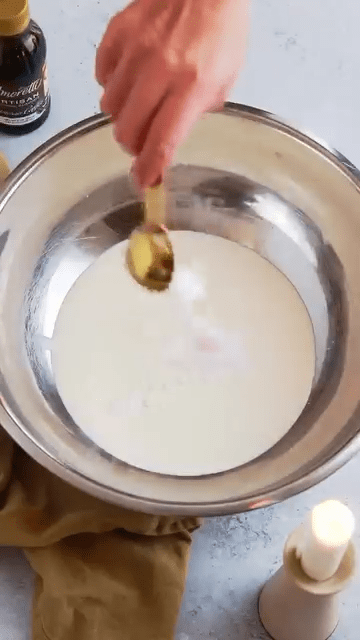
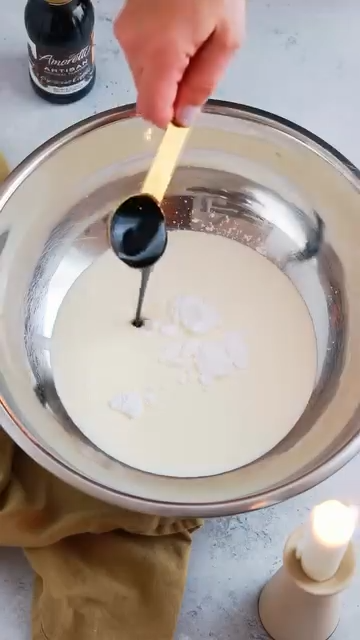
In a large bowl, add the remaining 1 1/3 cups of heavy whipping cream, powdered sugar, Amoretti Natural Espresso Coffee Artisan Flavor, and pure vanilla extract. Beat the mixture with an electric mixer on medium-high speed until stiff peaks form. You want the whipped cream to be thick and fluffy so it can hold the mousse together.
 |  |  |  |
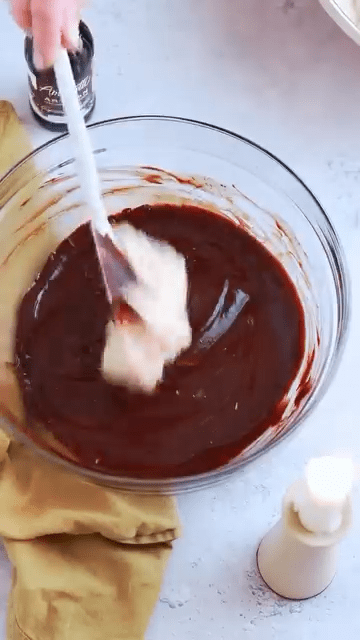
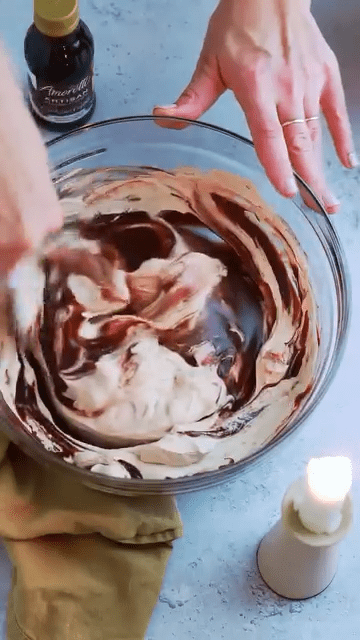
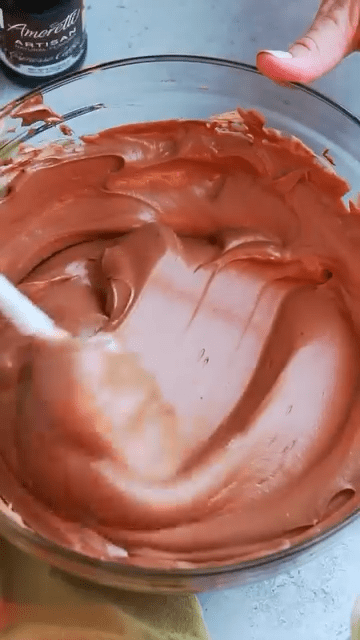
Step 4: Create the Mousse
Now for the best part — combining the two! Gently fold the whipped cream mixture into the cooled ganache. Use a rubber spatula and fold carefully until there are no streaks left. The mousse should be light, creamy, and rich in espresso flavor.
 |  |  |
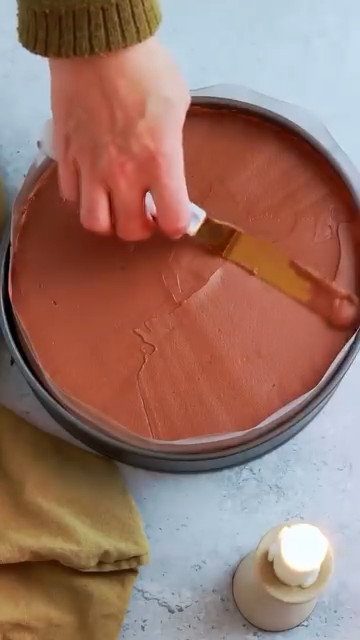
Step 5: Assemble the Cake
Spread the chocolate espresso mousse evenly over the chocolate cake layer inside the springform pan. Use an angled spatula to smooth the top nicely. Don’t worry if it’s not perfect — the rustic look adds to its homemade charm!
Cover the cake and refrigerate for at least 6 hours, preferably overnight. This chilling time allows the mousse to set firmly and makes the cake easier to slice.
 |  |
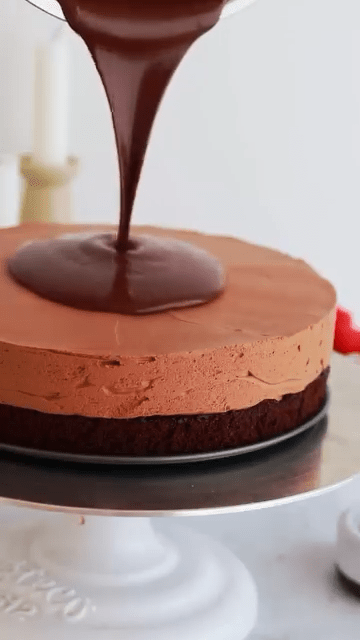
Step 6: Add the Finishing Touches
Once your cake is fully set, it’s time to make it look as amazing as it tastes. Top it with a silky chocolate ganache drizzle if you like, and decorate it with fresh raspberries and chocolate-covered espresso beans. These toppings add beautiful color, texture, and extra bursts of flavor that will make your cake stand out even more.
 |  |
Tips for Success
Use Good Chocolate: The flavor of your mousse depends heavily on the quality of your chocolate chips. Choose a semi-sweet chocolate that you love to eat by itself.
Don’t Skip the Cooling Time: Be patient with the ganache and the mousse setting times. Rushing the process can result in a sloppy cake.
Perfect Slices: To get clean slices, run your knife under hot water and wipe it dry between each cut.
Why You’ll Love This Cake
There are so many reasons to fall head over heels for this Chocolate Espresso Mousse Cake. It’s rich without being heavy, and the hint of espresso perfectly balances the sweetness of the chocolate. Plus, it looks absolutely stunning when you present it at the table — no one will believe how easy it is to make!
It’s a great make-ahead dessert too, making your life easier if you’re hosting a party or gathering. And that incredible mousse layer? It’s basically like eating a cloud made of chocolate and coffee. Who could resist that?
Final Thoughts
If you’re a chocolate lover, a coffee enthusiast, or just someone who enjoys a seriously good dessert, this Chocolate Espresso Mousse Cake is for you. It’s luxurious, impressive, and guaranteed to disappear quickly at any event.
So grab your mixing bowls, whip up this beauty, and get ready to savor a slice (or two) of pure happiness. Your taste buds will thank you!
Must Try Pistachio Chocolate Brownie Recipe
Chocolate Espresso Mousse Cake Recipe

Indulge in this rich Chocolate Espresso Mousse Cake recipe, featuring a moist chocolate base, airy espresso mousse, and luscious toppings.
Type: Dessert
Cuisine: American
Keywords: Chocolate Espresso Mousse Cake, Chocolate Mousse Cake, Espresso Cake, Chocolate Cake Recipe, Coffee Mousse Cake
Recipe Yield: 12 slices
Calories: Approximately 480 per slice
Preparation Time: 40 minutes
Cooking Time: 30 minutes
Total Time: 7 hours (including chilling)
Recipe Ingredients:
- 1 halved chocolate cake baked in a 9-inch springform pan
- 2 Cups (370g) semi-sweet chocolate chips
- 2 ⅓ Cups (560ml) heavy whipping cream, divided
- 2 Tablespoons Amoretti Natural Espresso Coffee Artisan Flavor
- 2 Tablespoons powdered sugar
- 1/2 teaspoon pure vanilla extract
- Chocolate ganache
- Fresh raspberries
- Chocolate-covered espresso beans
Recipe Instructions:
Prepare the Chocolate Cake:
- First, bake your favorite chocolate cake in a 9-inch springform pan. Once baked, allow it to cool completely. Then carefully slice the cake in half horizontally to create two thinner layers. For this recipe, we’re using just one half as the base, so you can save the other half for another dessert or enjoy it with a cup of coffee later! Line the springform pan again with parchment paper or plastic wrap, place one cake layer back into the bottom, and set aside.
Make the Chocolate Ganache:
- Place the semi-sweet chocolate chips in a glass or metal bowl. In a small saucepan, heat 1 cup of heavy whipping cream over medium-low heat. Watch carefully and remove from heat once it begins to simmer gently around the edges. Pour the hot cream over the chocolate chips and let it sit for a minute. Then whisk it into a smooth, glossy ganache. Set aside and allow it to cool to room temperature, which should take about 25 minutes. Tip: Cooling the ganache is important! If it’s too warm, it will deflate your whipped cream and make the mousse runny.
Whip the Cream:
- In a large bowl, add the remaining 1 1/3 cups of heavy whipping cream, powdered sugar, Amoretti Natural Espresso Coffee Artisan Flavor, and pure vanilla extract. Beat the mixture with an electric mixer on medium-high speed until stiff peaks form. You want the whipped cream to be thick and fluffy so it can hold the mousse together.
Create the Mousse:
- Now for the best part — combining the two! Gently fold the whipped cream mixture into the cooled ganache. Use a rubber spatula and fold carefully until there are no streaks left. The mousse should be light, creamy, and rich in espresso flavor.
Assemble the Cake:
- Spread the chocolate espresso mousse evenly over the chocolate cake layer inside the springform pan. Use an angled spatula to smooth the top nicely. Don’t worry if it’s not perfect — the rustic look adds to its homemade charm! Cover the cake and refrigerate for at least 6 hours, preferably overnight. This chilling time allows the mousse to set firmly and makes the cake easier to slice.
Add the Finishing Touches:
- Once your cake is fully set, it’s time to make it look as amazing as it tastes. Top it with a silky chocolate ganache drizzle if you like, and decorate it with fresh raspberries and chocolate-covered espresso beans. These toppings add beautiful color, texture, and extra bursts of flavor that will make your cake stand out even more.