
 By Esha Kamran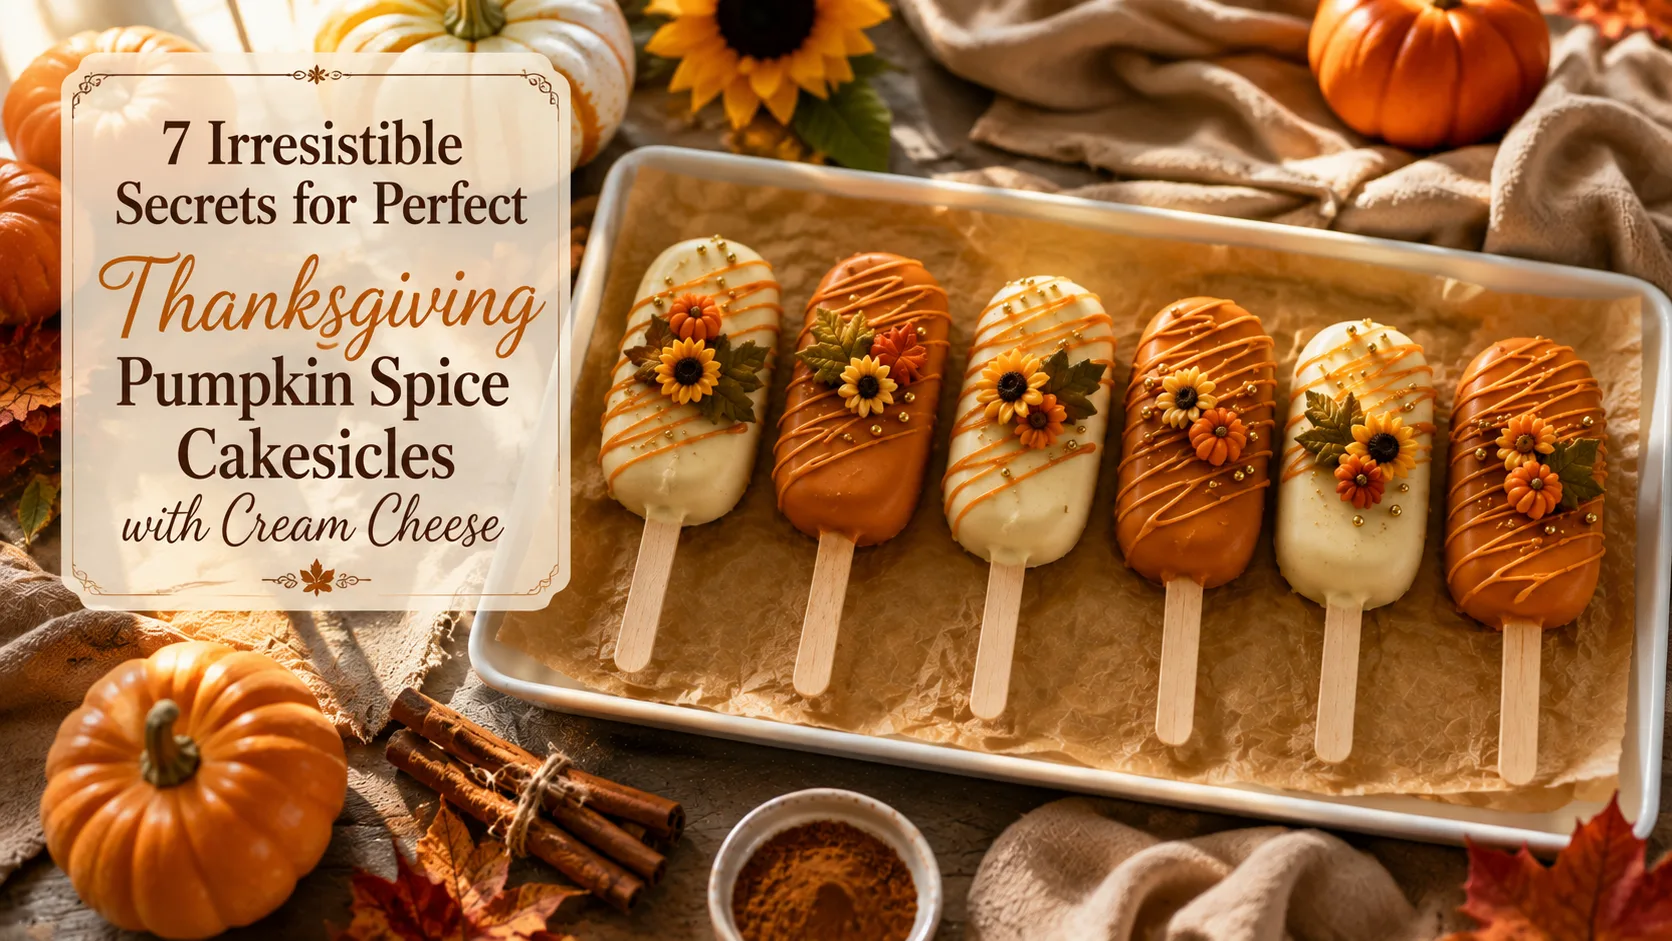
Thanksgiving desserts do not always have to be traditional pies. These Thanksgiving pumpkin spice cakesicles with cream cheese combine familiar autumn flavors with a fun, modern presentation. Beneath the smooth candy shell is a moist pumpkin-spice cake center mixed with tangy cream cheese frosting. Each cakesicle is rich, creamy and perfectly portioned, making it easy to serve at Thanksgiving dinners, autumn parties or family gatherings. These seasonal treats can also be prepared ahead of time, giving you one less dessert to worry about on Thanksgiving Day.
Why You’ll Love These Pumpkin Spice Cakesicles
These festive cakesicles are:
- Filled with warm pumpkin-spice flavor
- Moist, creamy and slightly tangy
- Easy to prepare in advance
- Convenient to serve without plates or forks
- Suitable for decorating in numerous Thanksgiving styles
- Perfect for dessert tables, party favors and edible gifts
- A creative way to use leftover pumpkin cake
What Are Cakesicles?
Cakesicles are cake-pop-style desserts shaped like small ice pops. They are usually prepared by combining cake crumbs with frosting and pressing the mixture into silicone cakesicle molds. A layer of melted candy coating or chocolate forms the outer shell. Unlike traditional round cake pops, cakesicles have a larger, flatter surface that provides plenty of room for decorative drizzles, sprinkles, nuts and seasonal designs.
Ingredients
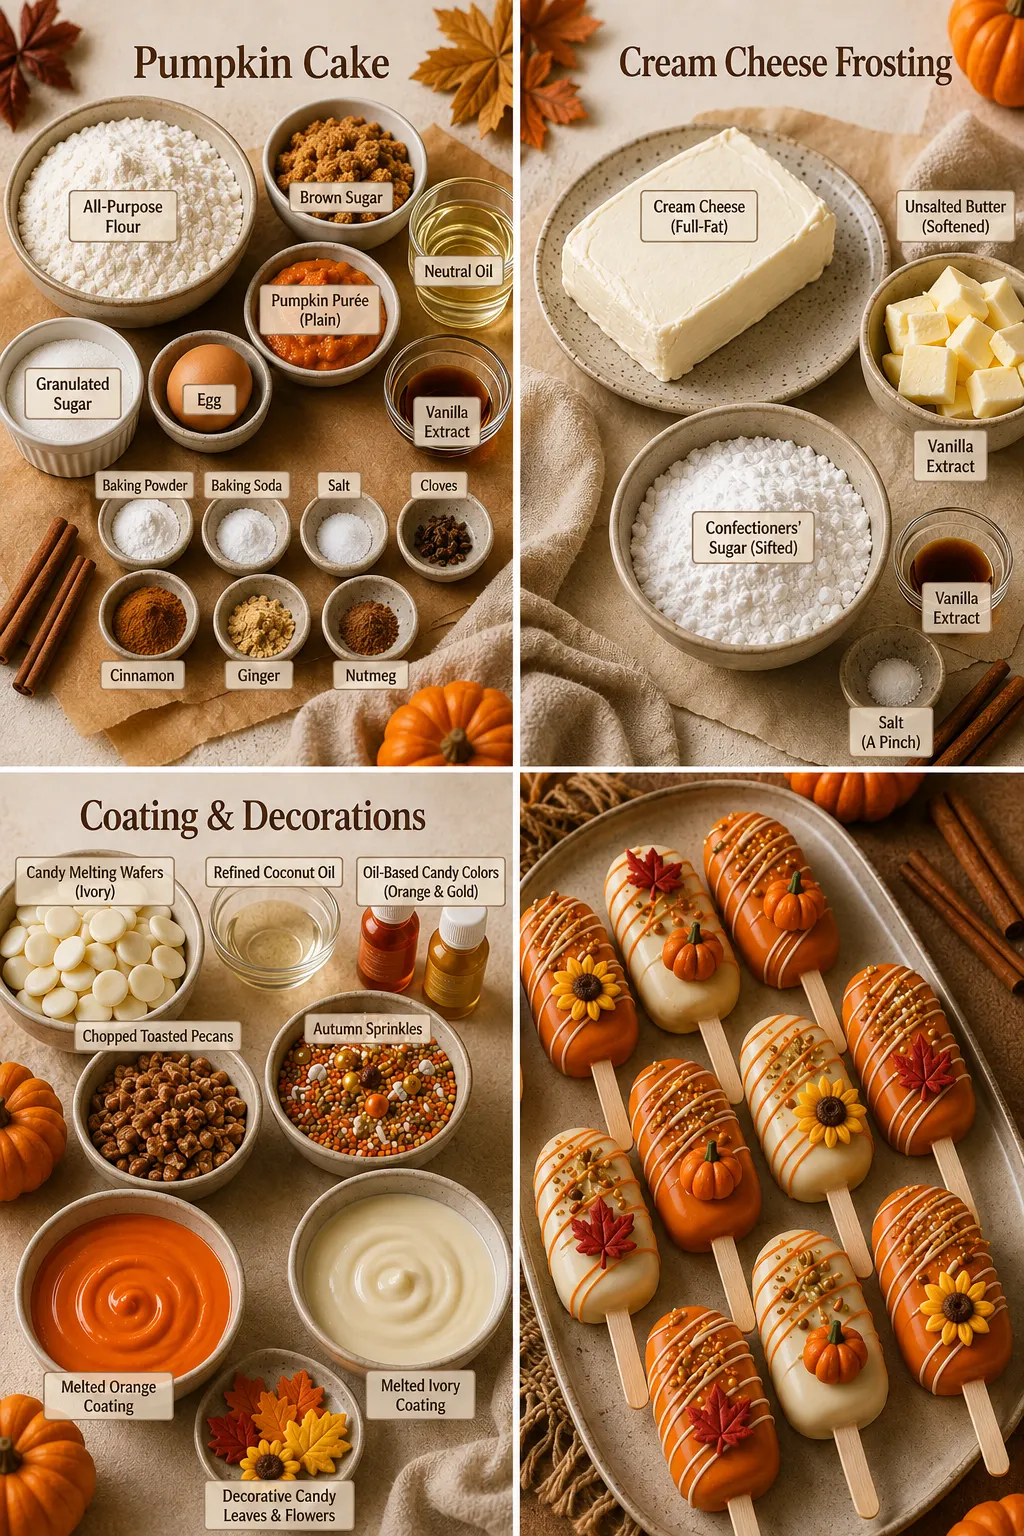
For the Pumpkin Spice Cake
- 1¼ cups all-purpose flour
- 1 teaspoon baking powder
- ½ teaspoon baking soda
- 1½ teaspoons ground cinnamon
- ½ teaspoon ground ginger
- ¼ teaspoon ground nutmeg
- ⅛ teaspoon ground cloves
- ¼ teaspoon fine salt
- 1 large egg, at room temperature
- ½ cup packed light brown sugar
- ¼ cup granulated sugar
- ½ cup neutral oil
- ¾ cup plain pumpkin purée
- 1 teaspoon vanilla extract
Use plain pumpkin purée rather than pumpkin pie filling. Pumpkin pie filling already contains sugar, spices and other ingredients that can change the sweetness and consistency of the cake.
For the Cream Cheese Frosting
- 3 ounces full-fat block cream cheese, softened
- 2 tablespoons unsalted butter, softened
- ¾ cup confectioners’ sugar, sifted
- ½ teaspoon vanilla extract
- Pinch of fine salt
For the Coating and Decorations
- 20 ounces vanilla candy-melting wafers
- 1–2 teaspoons refined coconut oil or vegetable shortening, if needed
- Orange, brown or gold oil-based candy coloring, optional
- Autumn sprinkles
- Chopped toasted pecans
- Candy leaves
- Contrasting melted candy wafers for drizzling
Equipment Needed
- 8-inch square baking pan
- Silicone cakesicle molds
- Food-safe cakesicle sticks
- Mixing bowls
- Whisk
- Rubber spatula
- Microwave-safe cup or double boiler
- Pastry brush or small spoon
- Parchment-lined baking tray
How to Make Thanksgiving Pumpkin Spice Cakesicles
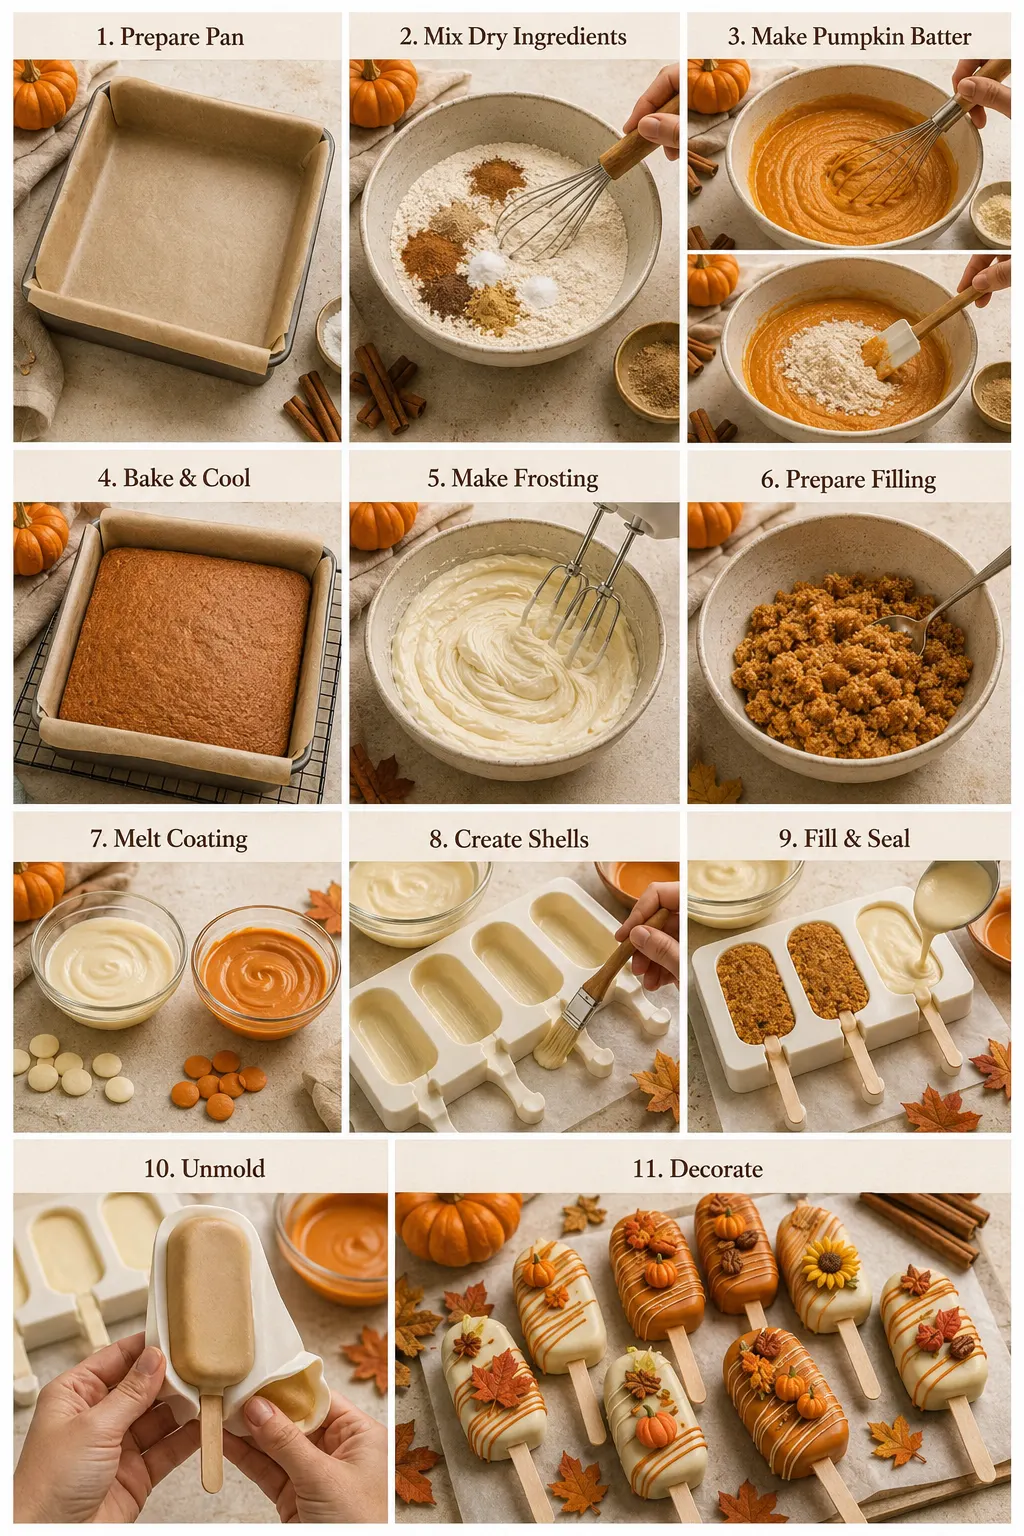
Step 1: Prepare the Oven and Pan
Preheat the oven to 350°F or 175°C. Lightly grease an 8-inch square baking pan and line the bottom with parchment paper. Leave a little parchment hanging over the sides so the baked cake can be removed easily.
Step 2: Combine the Dry Ingredients
Add the flour, baking powder, baking soda, cinnamon, ginger, nutmeg, cloves and salt to a medium mixing bowl. Whisk until the spices and raising agents are evenly distributed throughout the flour. This prevents concentrated pockets of baking soda or spices from developing in the finished cake.
Step 3: Prepare the Pumpkin Batter
In a large bowl, whisk the egg, brown sugar and granulated sugar until smooth. Add the oil, pumpkin purée and vanilla extract. Continue whisking until the mixture is thoroughly combined. Gradually add the dry ingredients to the pumpkin mixture. Fold gently with a spatula until no visible streaks of flour remain. Avoid overmixing because it can make the cake heavy or dense.
Step 4: Bake the Cake
Transfer the batter to the prepared pan and spread it into an even layer. Bake for approximately 22–28 minutes. The cake is ready when the center springs back when gently pressed and a toothpick inserted into the middle comes out with a few moist crumbs. Allow the cake to cool completely. Do not mix warm cake with cream cheese frosting, as the heat can melt the frosting and create an oily filling.
Step 5: Make the Cream Cheese Frosting
Place the softened cream cheese and butter in a mixing bowl. Beat until completely smooth. Add the confectioners’ sugar, vanilla extract and salt. Continue beating until the frosting is thick and creamy. The frosting does not need to be extremely fluffy because it will be used as a binding ingredient for the cake crumbs.
Step 6: Prepare the Cakesicle Filling
Crumble the completely cooled pumpkin cake into a large bowl. Break apart any large pieces until the crumbs have a fine and even consistency. Add approximately ⅓ cup of cream cheese frosting and mix thoroughly. Press a small amount of the mixture in your hand. It should hold its shape without feeling excessively wet, sticky or greasy. If the mixture remains crumbly, add more frosting one tablespoon at a time. Avoid adding all the frosting at once. Too much frosting can make the cakesicles overly soft and difficult to coat.
Step 7: Melt the Candy Coating
Place the candy-melting wafers in a microwave-safe bowl or cup. Microwave in short intervals according to the package instructions, stirring thoroughly between each interval. Stop heating when the coating is almost melted and continue stirring until completely smooth. If the coating appears unusually thick, mix in a small amount of refined coconut oil or vegetable shortening. Add only a little at a time because an overly thin coating can produce fragile shells.
Step 8: Create the Cakesicle Shells
Spoon some melted coating into each silicone mold. Use a small spoon or pastry brush to spread it over the bottom and sides. Insert a cakesicle stick briefly to clear the stick channel, and then remove it. Refrigerate the molds for approximately five minutes or until the coating is firm. Apply a second thin layer around the edges and stick opening, as these areas are most likely to crack. Chill the molds again until the second layer has set.
Step 9: Add the Pumpkin Cake Filling
Press the pumpkin cake mixture carefully into each coated mold. Leave approximately ⅛ inch of room at the top for the final coating layer. Insert the cakesicle sticks through the openings and into the cake mixture. Press gently around each stick to hold it securely in place. Cover the exposed filling with additional melted coating. Spread it evenly and scrape away any excess so the back of each cakesicle is reasonably smooth. Refrigerate for 10–15 minutes or until completely firm.
Step 10: Unmold the Cakesicles
Remove the molds from the refrigerator. Carefully pull the silicone away from the outer edges of each cakesicle. Continue peeling the mold back before gently lifting out the dessert. Do not pull firmly on the stick, as this can cause the cakesicle to break.
Step 11: Decorate
Drizzle the cakesicles with melted candy wafers in contrasting autumn colors. Immediately add sprinkles, toasted pecans, candy leaves or other decorations before the drizzle sets. Allow the decorations to become completely firm before arranging, storing or wrapping the cakesicles.
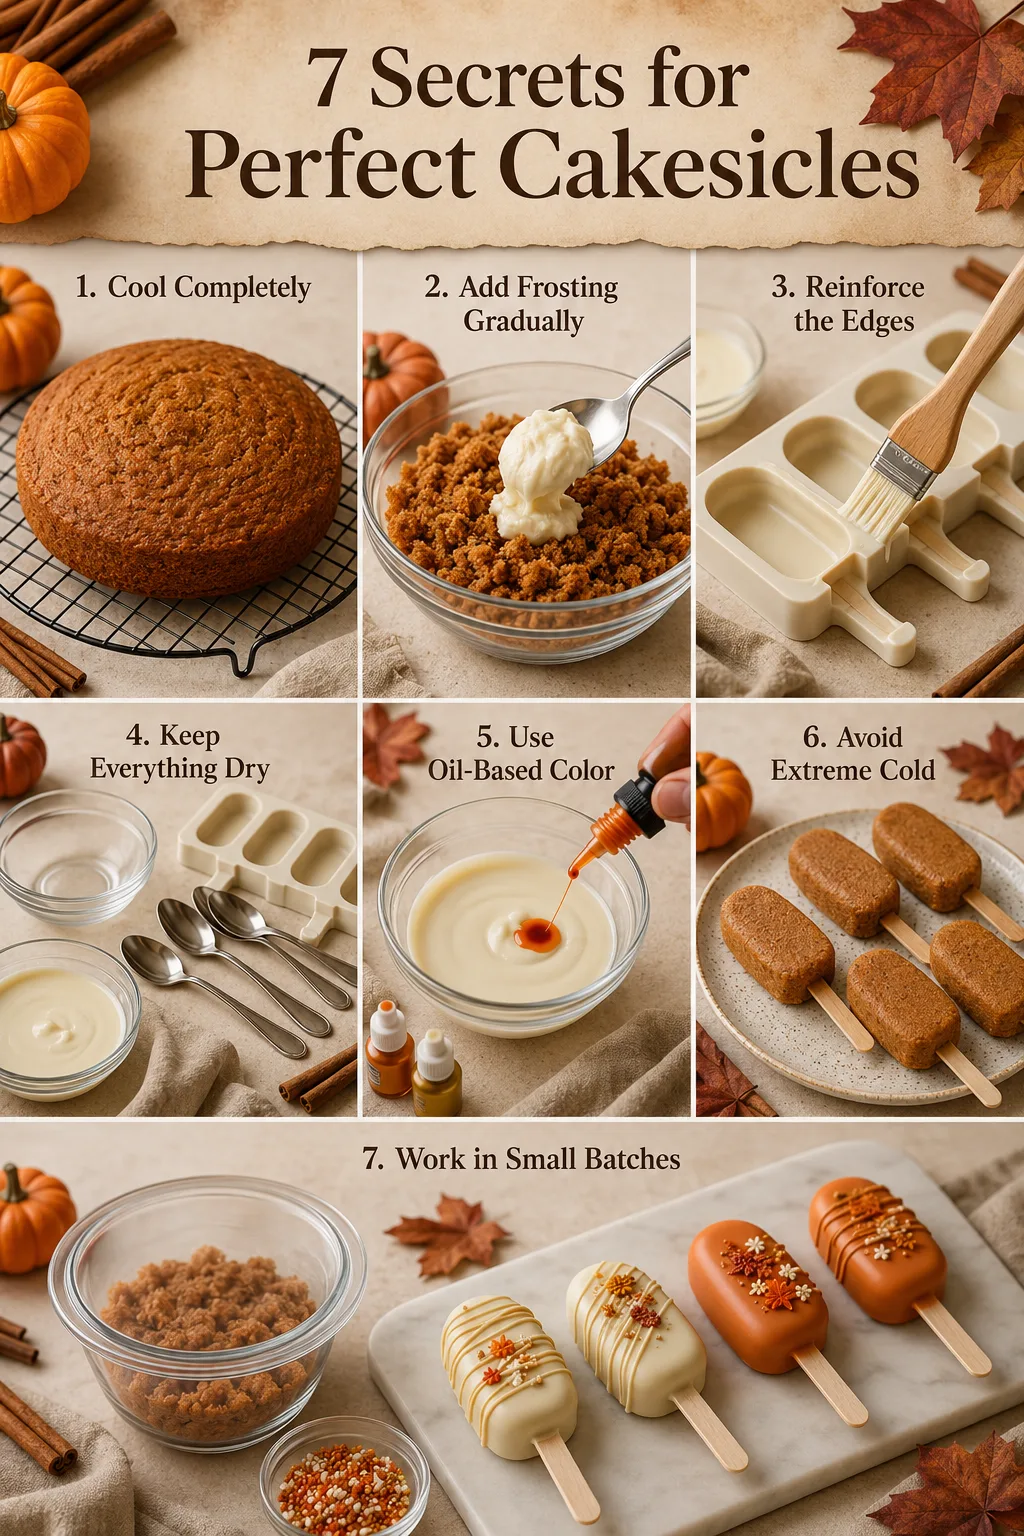
7 Irresistible Secrets for Perfect Cakesicles
1. Cool the Cake Completely
Even a slightly warm cake can soften the cream cheese frosting and make the mixture greasy. Allow the cake to cool fully before crumbling it.
2. Add the Frosting Gradually
Begin with a small amount of frosting. You can always add more, but it is difficult to correct a cake mixture that has become too wet.
3. Reinforce the Shell Edges
Apply a second layer of coating around the sides and stick opening. Stronger edges make the cakesicles easier to remove from the molds.
4. Keep the Coating Away From Water
Make sure your bowl, spoon and molds are completely dry. Even a small amount of water can cause melted candy coating to seize and become grainy.
5. Use Oil-Based Candy Coloring
Regular water-based food coloring can cause melted candy wafers to thicken or seize. Use coloring specifically designed for chocolate and candy coatings.
6. Avoid Extreme Temperature Changes
The filling should be chilled but not frozen solid when the shell is completed. Extremely cold filling can expand as it warms and cause the coating to crack.
7. Work in Small Batches
Coat and decorate a few cakesicles at a time. Keep the remaining filling chilled so it stays firm and easy to handle.
Thanksgiving Decoration Ideas
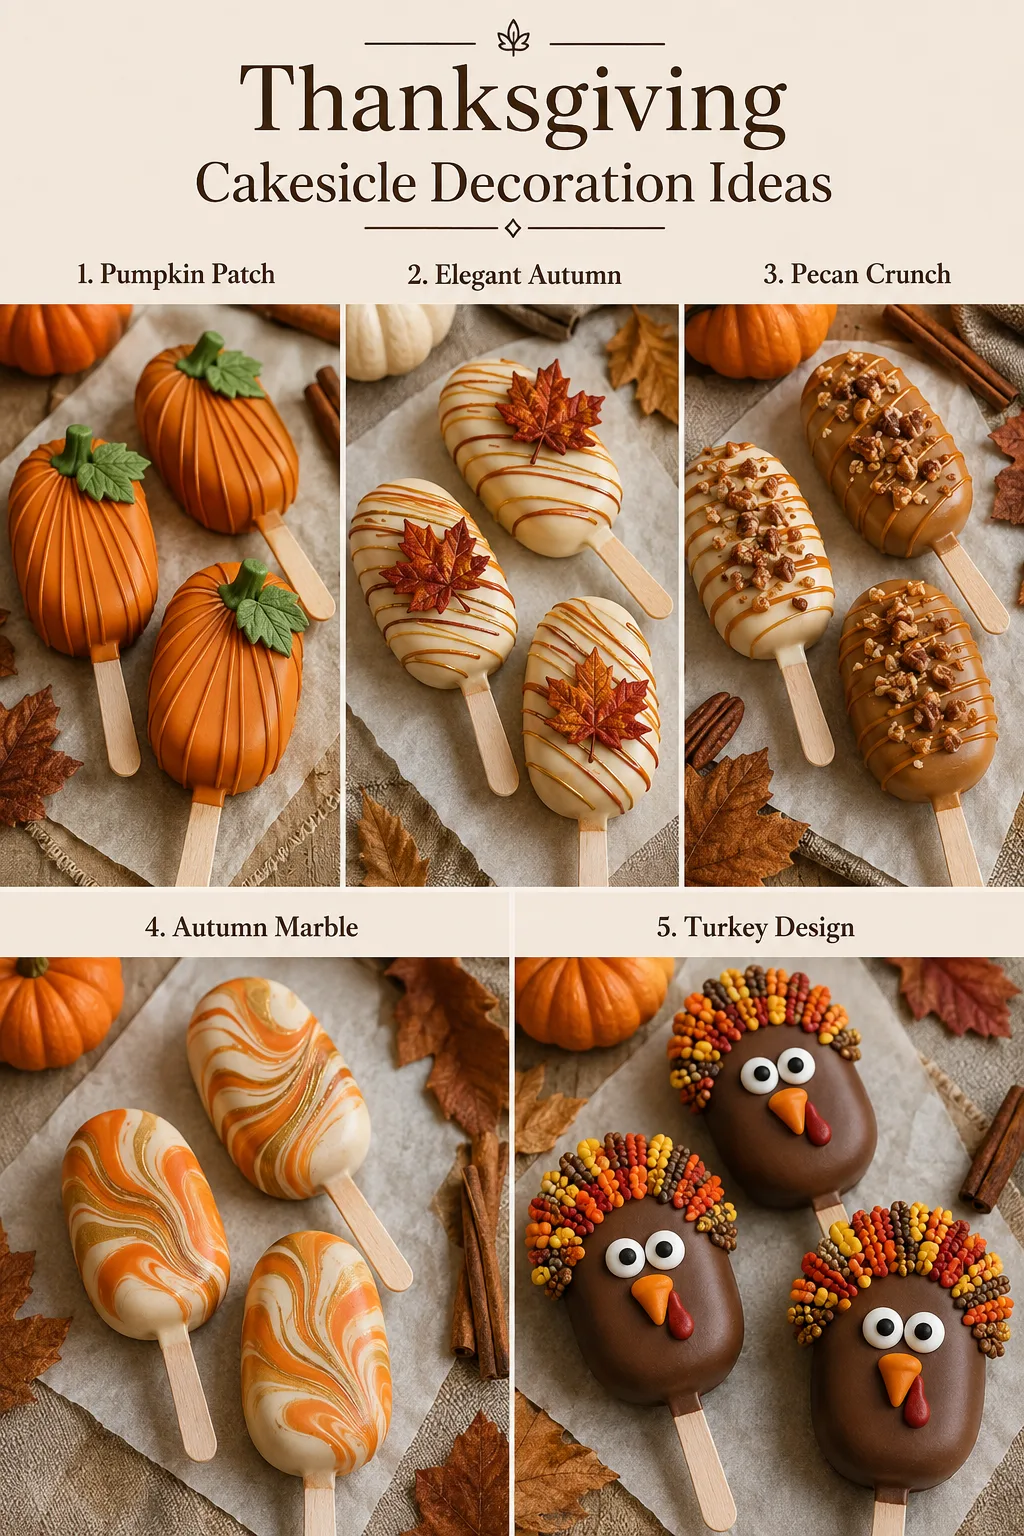
Pumpkin Patch Cakesicles
Tint the coating orange and add curved lines with a slightly darker shade. Finish each cakesicle with a small green candy stem or leaf.
Elegant Autumn Cakesicles
Use an ivory-colored coating with thin gold, rust and chocolate drizzles. Add one small candy leaf for a simple, elegant appearance.
Pecan Crunch Cakesicles
Cover the cakesicles with an ivory or caramel-colored shell. Add a thin drizzle and sprinkle finely chopped toasted pecans over the top.
Autumn Marble Cakesicles
Place small amounts of orange, ivory and gold coating inside the mold. Swirl the colors lightly before creating the shell. Avoid overmixing the colors or the marbled effect may disappear.
Turkey Cakesicles
Add candy eyes, a small orange beak and fan-shaped sprinkle decorations. These playful cakesicles are ideal for a children’s Thanksgiving table.
Easy Flavor Variations
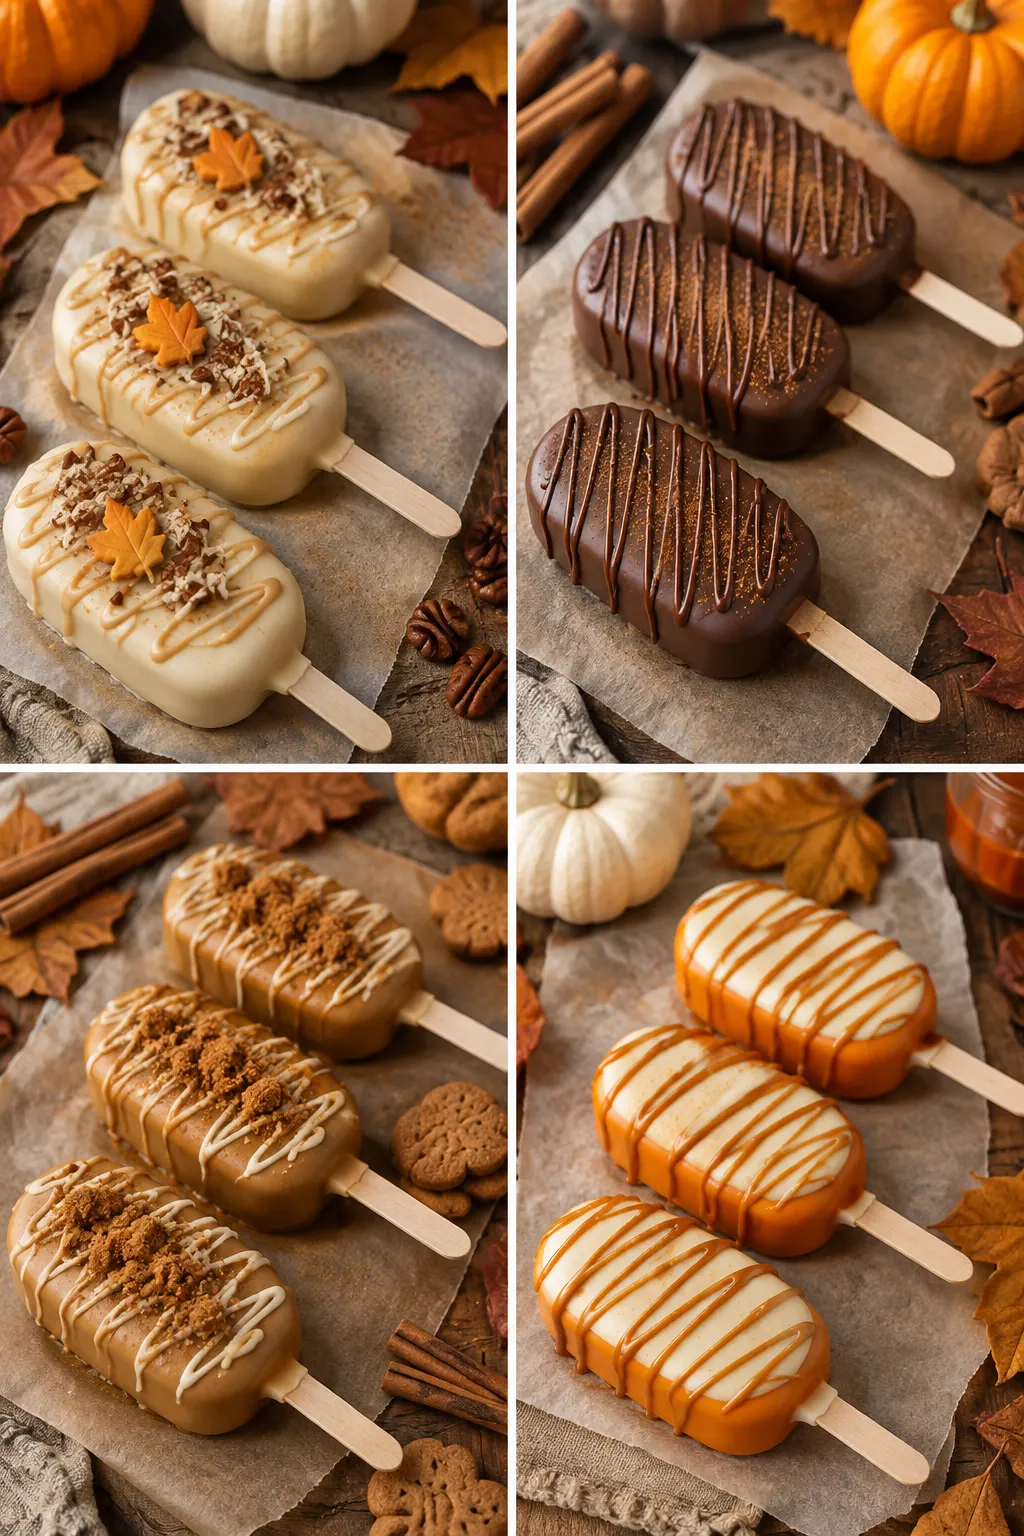
Maple Pumpkin Cakesicles
Replace the vanilla in the frosting with ½ teaspoon maple extract. Decorate the cakesicles with chopped toasted pecans.
Chocolate Pumpkin Cakesicles
Use milk or dark chocolate instead of vanilla candy wafers. The deeper chocolate flavor provides a rich contrast with the pumpkin-spice filling.
Gingersnap Pumpkin Cakesicles
Mix approximately ⅓ cup of finely crushed gingersnap cookies into the cake crumbs. Add the cream cheese frosting gradually until the mixture holds together.
Caramel Pumpkin Cakesicles
Finish the cakesicles with a very thin caramel drizzle after the coating has set. Avoid adding too much caramel because it can make the surface sticky.
Make-Ahead Instructions
These Thanksgiving pumpkin spice cakesicles can be prepared one or two days before serving. Make and decorate the cakesicles as directed, then arrange them in a single layer inside an airtight container. Place parchment paper between layers if stacking is necessary. Keep the container refrigerated until shortly before serving.
Frequently Asked Questions
Can I Use Boxed Cake Mix?
Yes. Prepare a pumpkin or spice cake mix according to the package instructions. Allow the cake to cool completely before crumbling it. Begin with a small quantity of cream cheese frosting because boxed cakes can vary in moisture.
Can I Use White Chocolate Instead of Candy Wafers?
Yes, but real white chocolate should be properly tempered to create a firm, glossy shell. Candy-melting wafers are usually easier for beginners because they set without tempering.
Why Did My Cakesicle Coating Crack?
The filling may have been too cold, the shell may have been too thin or the coating may have been overheated. Allow frozen or extremely cold filling to warm slightly before sealing it. Reinforce the shell around its edges and avoid overheating the coating.
Why Are My Cakesicles Difficult to Remove?
The coating may not have set completely. Refrigerate the mold for a few more minutes before trying again. Peel the silicone mold away from the cakesicle instead of pulling the dessert out by its stick.
Can I Make Cakesicles Without a Mold?
Yes. Shape the cake mixture into small, flattened oval pieces and refrigerate until firm. Dip the end of each stick into melted coating before inserting it into the filling. Chill again, then dip each shaped cake piece into the coating. The cakesicles will have a more rustic appearance, but the flavor will remain delicious.
Food-Safety Notes
Because these cakesicles contain cream cheese, keep them refrigerated. Do not leave them at room temperature for longer than two hours. If the surrounding temperature is above 90°F or 32°C, refrigerate them within one hour. Check the labels on candy wafers, sprinkles and decorations if serving guests with dairy, nut, soy or gluten allergies.
Thanksgiving Pumpkin Spice Cakesicles Recipe Card
Recipe: Thanksgiving Pumpkin Spice Cakesicles with Cream Cheese
Yield: Approximately 12 cakesicles
Preparation Time: 45 minutes
Baking Time: 22–28 minutes
Cooling and Decorating Time: Approximately 35 minutes
Total Time: Approximately 1 hour and 50 minutes, including cooling
Method at a Glance
- Prepare and bake the pumpkin spice cake.
- Allow the cake to cool completely.
- Make the cream cheese frosting.
- Crumble the cake and mix it with a small amount of frosting.
- Melt the candy wafers.
- Create shells inside the silicone cakesicle molds.
- Add the cake filling and insert the sticks.
- Seal the cakesicles with additional coating.
- Chill until firm.
- Unmold and decorate.
Final Thoughts
These Thanksgiving pumpkin spice cakesicles with cream cheese bring classic holiday flavors to a modern and convenient dessert. The soft spiced center, tangy frosting and delicate candy shell create a delicious contrast in every bite.
Prepare them ahead of time, decorate them in your favorite autumn style and serve them as part of your Thanksgiving dessert table. They are festive, easy to share and certain to capture the attention of both children and adults.
Check our Instagram and Facebook pages for more recipes.
